> ## Documentation Index
> Fetch the complete documentation index at: https://docs.flowscale.ai/llms.txt
> Use this file to discover all available pages before exploring further.
# Workflow Configuration
> Configure your workflows for deployment with FlowScale I/O nodes or advanced API settings
To deploy a workflow as an API or playground UI, you must configure the workflow's input and output parameters. By default, the FlowScale platform doesn't automatically determine which nodes should serve as input and output endpoints - this must be explicitly configured.
Workflows that haven't been configured for deployment will show a **red cross mark** in your project's workflow sidebar. Properly configured workflows display a **green checkmark**.
## Configuration Methods
There are two ways to configure your workflow for deployment:
Use specialized FlowScale I/O nodes designed specifically for deployment configuration. This is the simplest and most straightforward approach.
Use the advanced configuration interface for complex setups that require granular control over input/output parameters.
## Method 1: FlowScale I/O Nodes
The recommended approach uses FlowScale's specialized input and output nodes, which are prefixed with `[FS]` in the node search.
### Adding Input Nodes
Double-click on an empty area in the ComfyUI workspace to open the node search dialog
Type one of the following input node names:
* **InputText** - For text prompts and string inputs
* **InputImage** - For image uploads
* **InputNumber** - For numeric parameters
* **InputSlider** - For slider controls
Choose nodes with the **"\[FS]"** prefix, indicating they are FlowScale-specific nodes
Connect these input nodes to your workflow where external inputs are needed
### Adding Output Nodes
In the node search, type one of the following output node names:
* **SaveImage** - For image outputs
* **SaveText** - For text outputs
* **SaveVideo** - For video outputs
* **SaveAudio** - For audio outputs
Choose nodes with the **"\[FS]"** prefix
Connect these output nodes to capture the final results of your workflow
### Available FlowScale I/O Nodes
| Node Type | Purpose | Use Case |
| --------------------- | ---------------- | -------------------------------------- |
| **\[FS] InputText** | Text input field | Prompts, descriptions, parameters |
| **\[FS] InputImage** | Image upload | Reference images, masks, source images |
| **\[FS] InputNumber** | Numeric input | Steps, strength, dimensions |
| **\[FS] InputSlider** | Range slider | CFG scale, denoise strength |
| **\[FS] SaveImage** | Image output | Generated images, processed images |
| **\[FS] SaveText** | Text output | Generated text, metadata |
| **\[FS] SaveVideo** | Video output | Animated sequences |
| **\[FS] SaveAudio** | Audio output | Generated audio files |
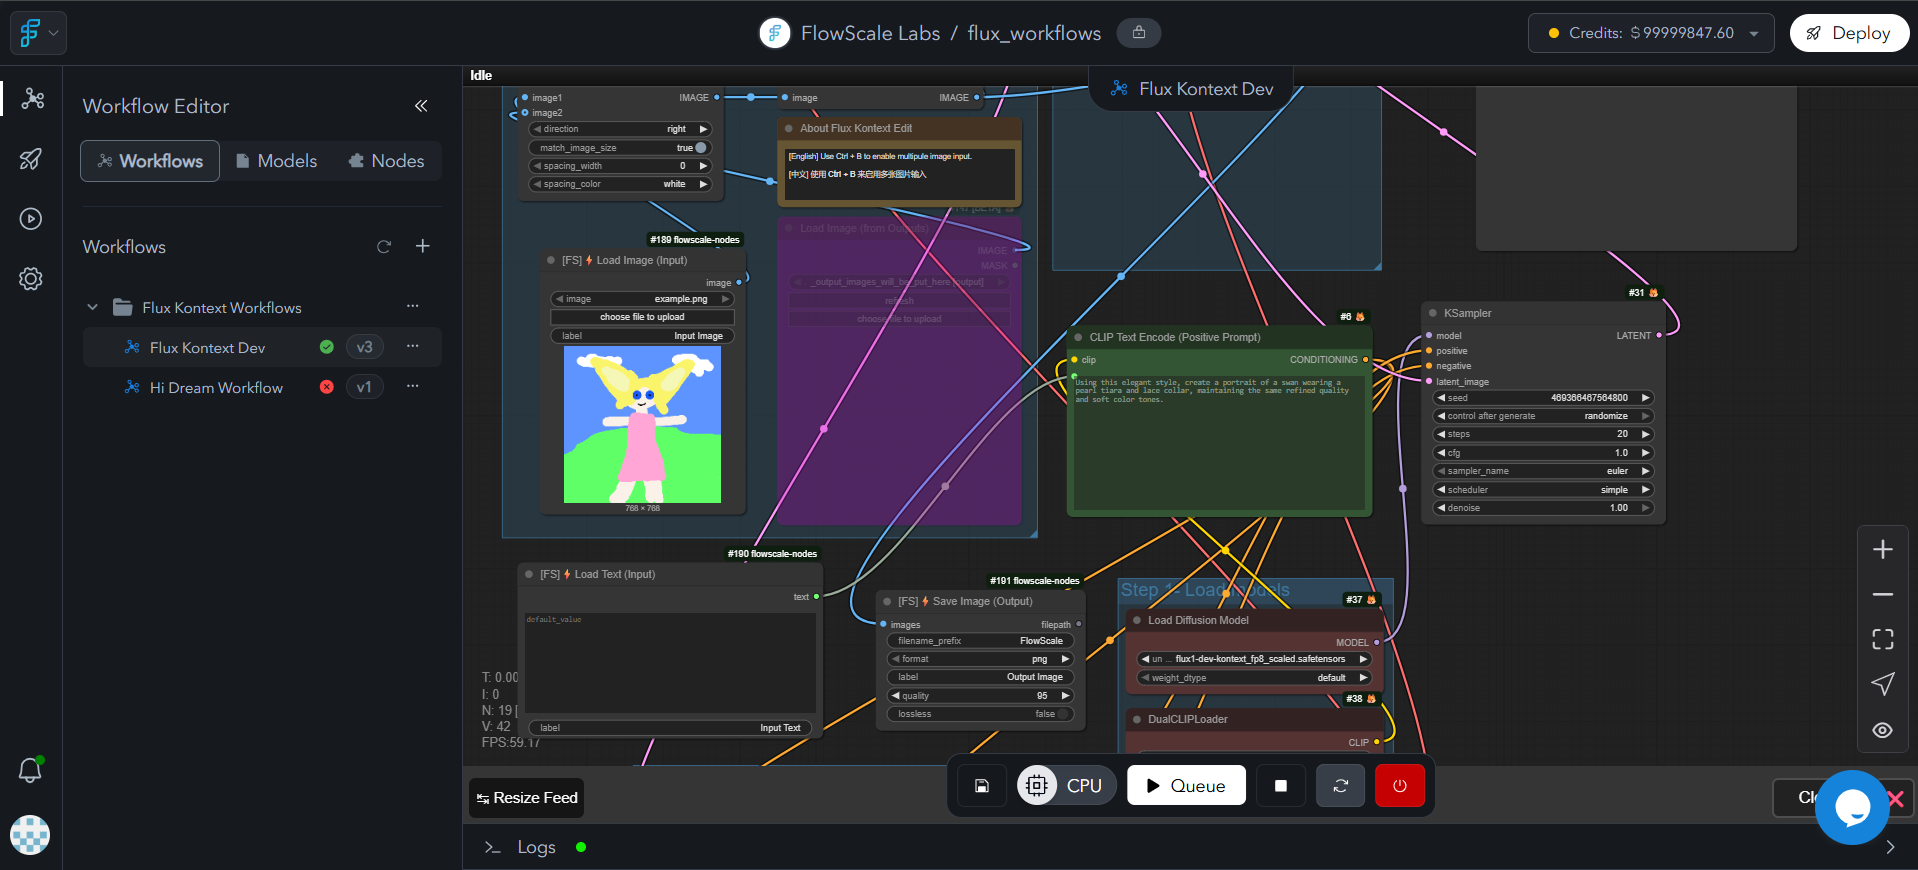 **Image Description for Team:** Screenshot showing FlowScale I/O nodes integration: ComfyUI workspace with FlowScale I/O nodes being added, \[FS] prefix clearly visible on FlowScale-specific nodes, examples of both input nodes (InputText, InputImage) and output nodes (SaveImage, SaveText), connection process between I/O nodes and existing workflow nodes, professional interface showing the configuration process.
### Verify Configuration
After adding FlowScale I/O nodes:
Ensure all I/O nodes are properly connected to your workflow
Click the **Save** button in the ComfyUI workspace
Look for a **green checkmark** next to your workflow in the left sidebar, indicating successful configuration
## Method 2: Advanced API Configuration
For more complex scenarios or when you need granular control over the API configuration, you can use the Advanced API Settings.
### Accessing Advanced Settings
Click the **three dots icon** next to your workflow in the left sidebar
Click on **"Advanced API Settings"** from the dropdown menu
Toggle the switch to enable Advanced API Settings mode. This overrides the default FlowScale nodes method.
By default, Advanced API Settings are disabled because the platform uses FlowScale I/O nodes as the primary configuration method. Enable this only when you need advanced control.
### Configuring Input and Output Nodes
Once Advanced API Settings are enabled, you'll see a dialog with two columns:
In the **left column**, select all nodes that should serve as input endpoints for your API
In the **right column**, select all nodes that should serve as output endpoints for your API
For each selected node:
* All available parameters will be displayed with prefilled values from the workflow
* **Check the parameters** you want to include in the API
* Add **parameter labels** that will be displayed in the playground UI
**Important**: Simply selecting a node is not enough. You must also check the specific parameters you want to include. If no parameters are selected for a node, it will not be considered as an input/output.
### Parameter Configuration
For each selected parameter, you can configure:
* **Parameter inclusion**: Check the box to include the parameter in the API
* **Parameter label**: The display name shown in the playground UI
* **Default values**: Pre-filled from your workflow configuration
## Impact on API and Playground
The I/O configuration directly affects:
### API Generation
* **Input parameters** become the API request payload structure
* **Output parameters** define the API response format
* **Parameter types** determine validation and documentation
### Playground UI
* **Input fields** are automatically generated based on configured input nodes
* **Output displays** are created for each configured output node
* **Parameter labels** are used as field names in the interface
## Best Practices
* Use descriptive parameter labels for better user experience
* Only expose parameters that users should control
* Keep the number of input parameters manageable
* Ensure all critical outputs are captured
* Test your configuration with the FlowScale I/O nodes first
* Verify the playground UI reflects your intended interface
* Run test API calls to validate input/output structure
* Check that all parameters behave as expected
* Start with FlowScale I/O nodes for most use cases
* Use Advanced API Configuration only when you need:
* Custom parameter grouping
* Complex validation rules
* Integration with existing workflow nodes
* Granular control over API structure
## Deploy Your Workflow
Once your workflow is configured (showing a green checkmark), you can deploy it.
### Deployment Process
Click the **"Deploy"** button in the top-right corner of the application
**Image Description for Team:** Screenshot showing FlowScale I/O nodes integration: ComfyUI workspace with FlowScale I/O nodes being added, \[FS] prefix clearly visible on FlowScale-specific nodes, examples of both input nodes (InputText, InputImage) and output nodes (SaveImage, SaveText), connection process between I/O nodes and existing workflow nodes, professional interface showing the configuration process.
### Verify Configuration
After adding FlowScale I/O nodes:
Ensure all I/O nodes are properly connected to your workflow
Click the **Save** button in the ComfyUI workspace
Look for a **green checkmark** next to your workflow in the left sidebar, indicating successful configuration
## Method 2: Advanced API Configuration
For more complex scenarios or when you need granular control over the API configuration, you can use the Advanced API Settings.
### Accessing Advanced Settings
Click the **three dots icon** next to your workflow in the left sidebar
Click on **"Advanced API Settings"** from the dropdown menu
Toggle the switch to enable Advanced API Settings mode. This overrides the default FlowScale nodes method.
By default, Advanced API Settings are disabled because the platform uses FlowScale I/O nodes as the primary configuration method. Enable this only when you need advanced control.
### Configuring Input and Output Nodes
Once Advanced API Settings are enabled, you'll see a dialog with two columns:
In the **left column**, select all nodes that should serve as input endpoints for your API
In the **right column**, select all nodes that should serve as output endpoints for your API
For each selected node:
* All available parameters will be displayed with prefilled values from the workflow
* **Check the parameters** you want to include in the API
* Add **parameter labels** that will be displayed in the playground UI
**Important**: Simply selecting a node is not enough. You must also check the specific parameters you want to include. If no parameters are selected for a node, it will not be considered as an input/output.
### Parameter Configuration
For each selected parameter, you can configure:
* **Parameter inclusion**: Check the box to include the parameter in the API
* **Parameter label**: The display name shown in the playground UI
* **Default values**: Pre-filled from your workflow configuration
## Impact on API and Playground
The I/O configuration directly affects:
### API Generation
* **Input parameters** become the API request payload structure
* **Output parameters** define the API response format
* **Parameter types** determine validation and documentation
### Playground UI
* **Input fields** are automatically generated based on configured input nodes
* **Output displays** are created for each configured output node
* **Parameter labels** are used as field names in the interface
## Best Practices
* Use descriptive parameter labels for better user experience
* Only expose parameters that users should control
* Keep the number of input parameters manageable
* Ensure all critical outputs are captured
* Test your configuration with the FlowScale I/O nodes first
* Verify the playground UI reflects your intended interface
* Run test API calls to validate input/output structure
* Check that all parameters behave as expected
* Start with FlowScale I/O nodes for most use cases
* Use Advanced API Configuration only when you need:
* Custom parameter grouping
* Complex validation rules
* Integration with existing workflow nodes
* Granular control over API structure
## Deploy Your Workflow
Once your workflow is configured (showing a green checkmark), you can deploy it.
### Deployment Process
Click the **"Deploy"** button in the top-right corner of the application
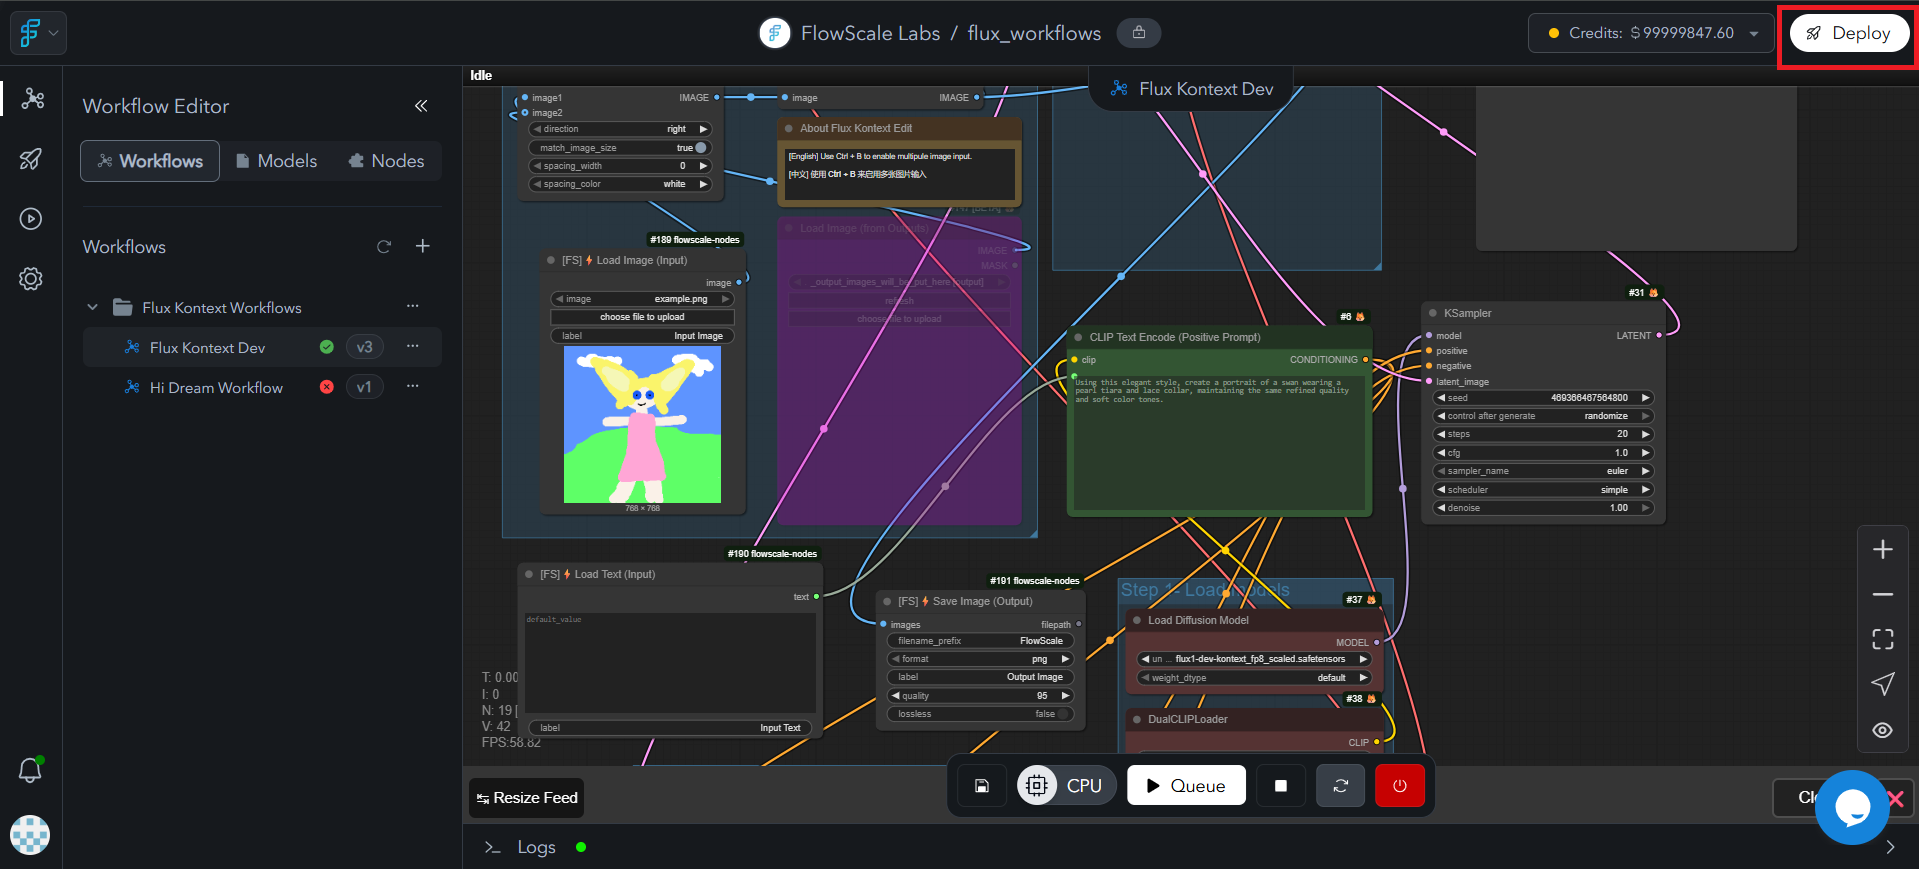 **Image Description for Team:** Screenshot showing deploy button location: FlowScale interface with deploy button prominently displayed in top-right corner or main action area, deploy button clearly highlighted (blue/primary color), context showing workflow is ready for deployment (green checkmark visible), professional interface design with clear call-to-action.
A dialog box will appear asking you to select the Pod for deployment
**Image Description for Team:** Screenshot showing deploy button location: FlowScale interface with deploy button prominently displayed in top-right corner or main action area, deploy button clearly highlighted (blue/primary color), context showing workflow is ready for deployment (green checkmark visible), professional interface design with clear call-to-action.
A dialog box will appear asking you to select the Pod for deployment
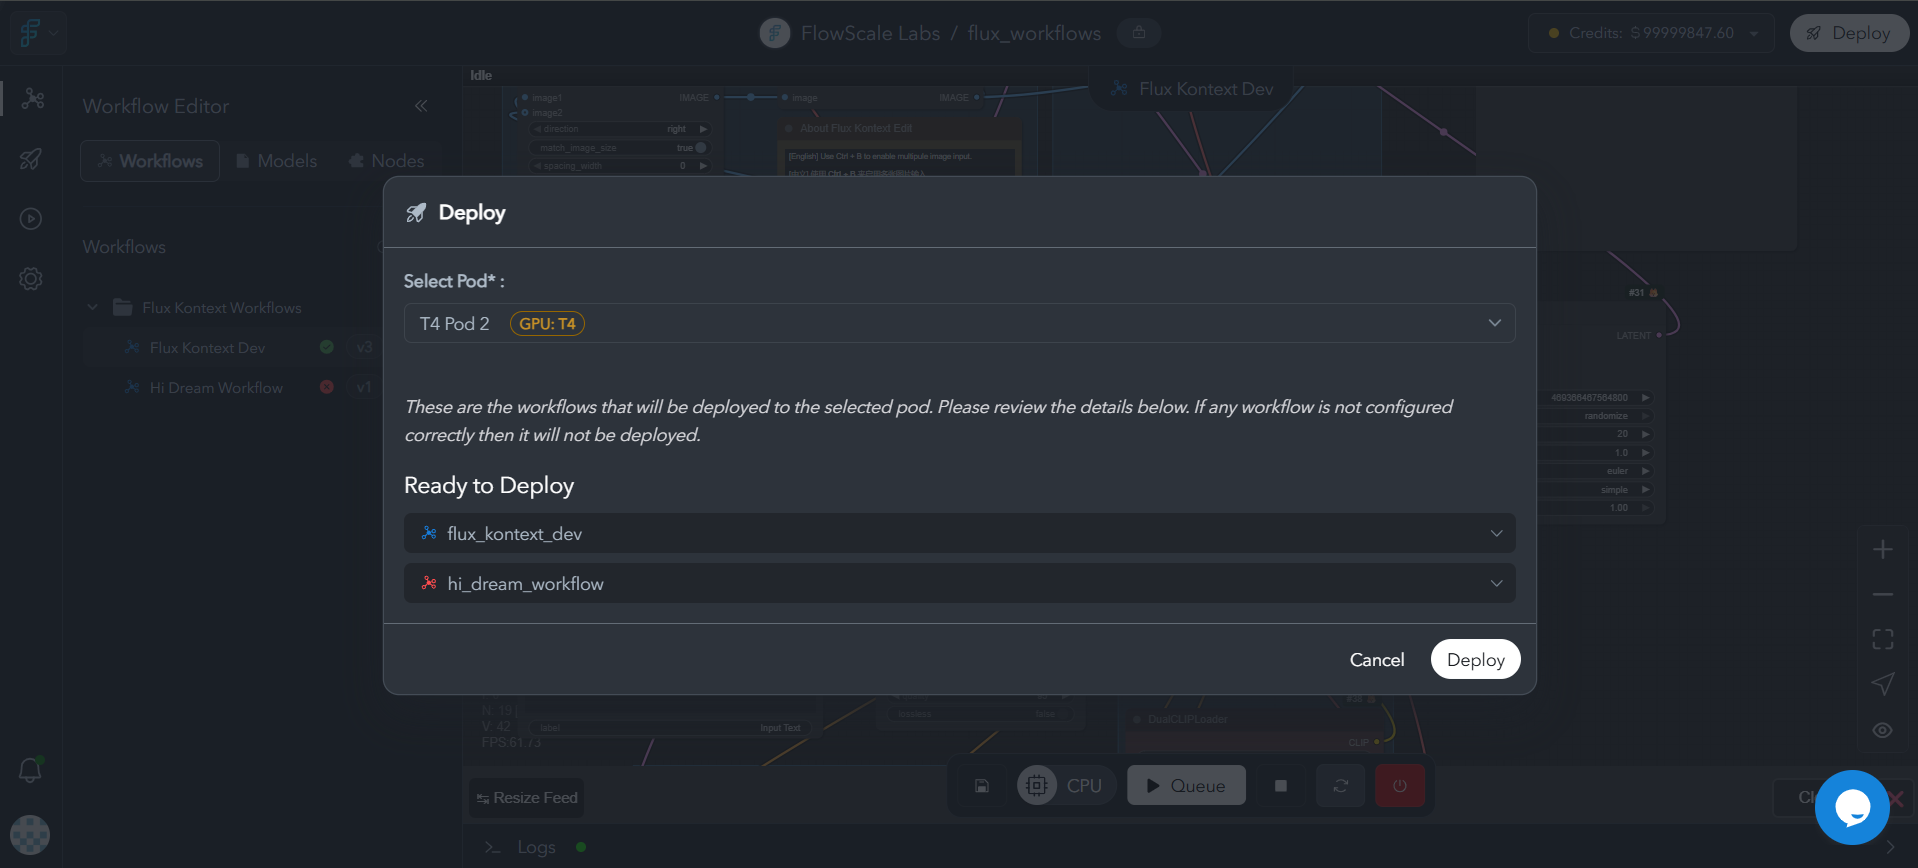 **Image Description for Team:** Screenshot of pod selection modal showing dialog for selecting deployment pod configuration, list of available GPU types (T4, A10G, L4, L40S, A100 40GB, A100 80GB, H100, H200, B200), resource specifications and pricing for each option, memory and compute requirements display, availability status indicators, "Deploy" and "Cancel" buttons, professional deployment configuration interface.
Select the appropriate pod based on your workflow requirements:
* **GPU type** needed for your models
* **Memory requirements** for your workflow
* **Expected usage** patterns
Click **Deploy** to start the deployment process
For detailed information about pod types, specifications, and choosing the right configuration for your workflow, refer to our [Pods documentation](/getting-started/glossary/pods).
## Next Steps
Create shareable interfaces for your configured deployment
Integrate your deployment using SDKs or REST APIs
**Image Description for Team:** Screenshot of pod selection modal showing dialog for selecting deployment pod configuration, list of available GPU types (T4, A10G, L4, L40S, A100 40GB, A100 80GB, H100, H200, B200), resource specifications and pricing for each option, memory and compute requirements display, availability status indicators, "Deploy" and "Cancel" buttons, professional deployment configuration interface.
Select the appropriate pod based on your workflow requirements:
* **GPU type** needed for your models
* **Memory requirements** for your workflow
* **Expected usage** patterns
Click **Deploy** to start the deployment process
For detailed information about pod types, specifications, and choosing the right configuration for your workflow, refer to our [Pods documentation](/getting-started/glossary/pods).
## Next Steps
Create shareable interfaces for your configured deployment
Integrate your deployment using SDKs or REST APIs