> ## Documentation Index
> Fetch the complete documentation index at: https://docs.flowscale.ai/llms.txt
> Use this file to discover all available pages before exploring further.
# Playground UI
> Test and share your deployed workflows with interactive, user-friendly playground interfaces
**This is the moment your technical AI workflow becomes accessible to everyone.** Playground UIs transform your sophisticated ComfyUI creations into polished, user-friendly interfaces that anyone can use—no technical knowledge required.
**The "aha" moment:** Watch non-technical team members, clients, or stakeholders use your complex AI workflows as easily as filling out a web form. What took you hours to perfect in ComfyUI now takes them seconds to use effectively.
**Automatic Magic:** Every workflow you deploy instantly generates its own playground. No additional configuration, no UI development, no user training required. Your ComfyUI logic becomes a professional web application automatically.
## Sharing Your AI Innovation
**Ready to see your workflow in action through fresh eyes?** Opening a playground transforms the experience from "let me show you how this works" to "try it yourself and see what you can create."
### Opening Your User-Friendly Interface
Go to the **API Server** section of your project from the main navigation
Locate the workflow you want to test in the **Deployed Workflows** list
Click to expand the workflow entry to reveal additional options and information
Click the **"Open Playground"** button to launch the playground interface in a new tab
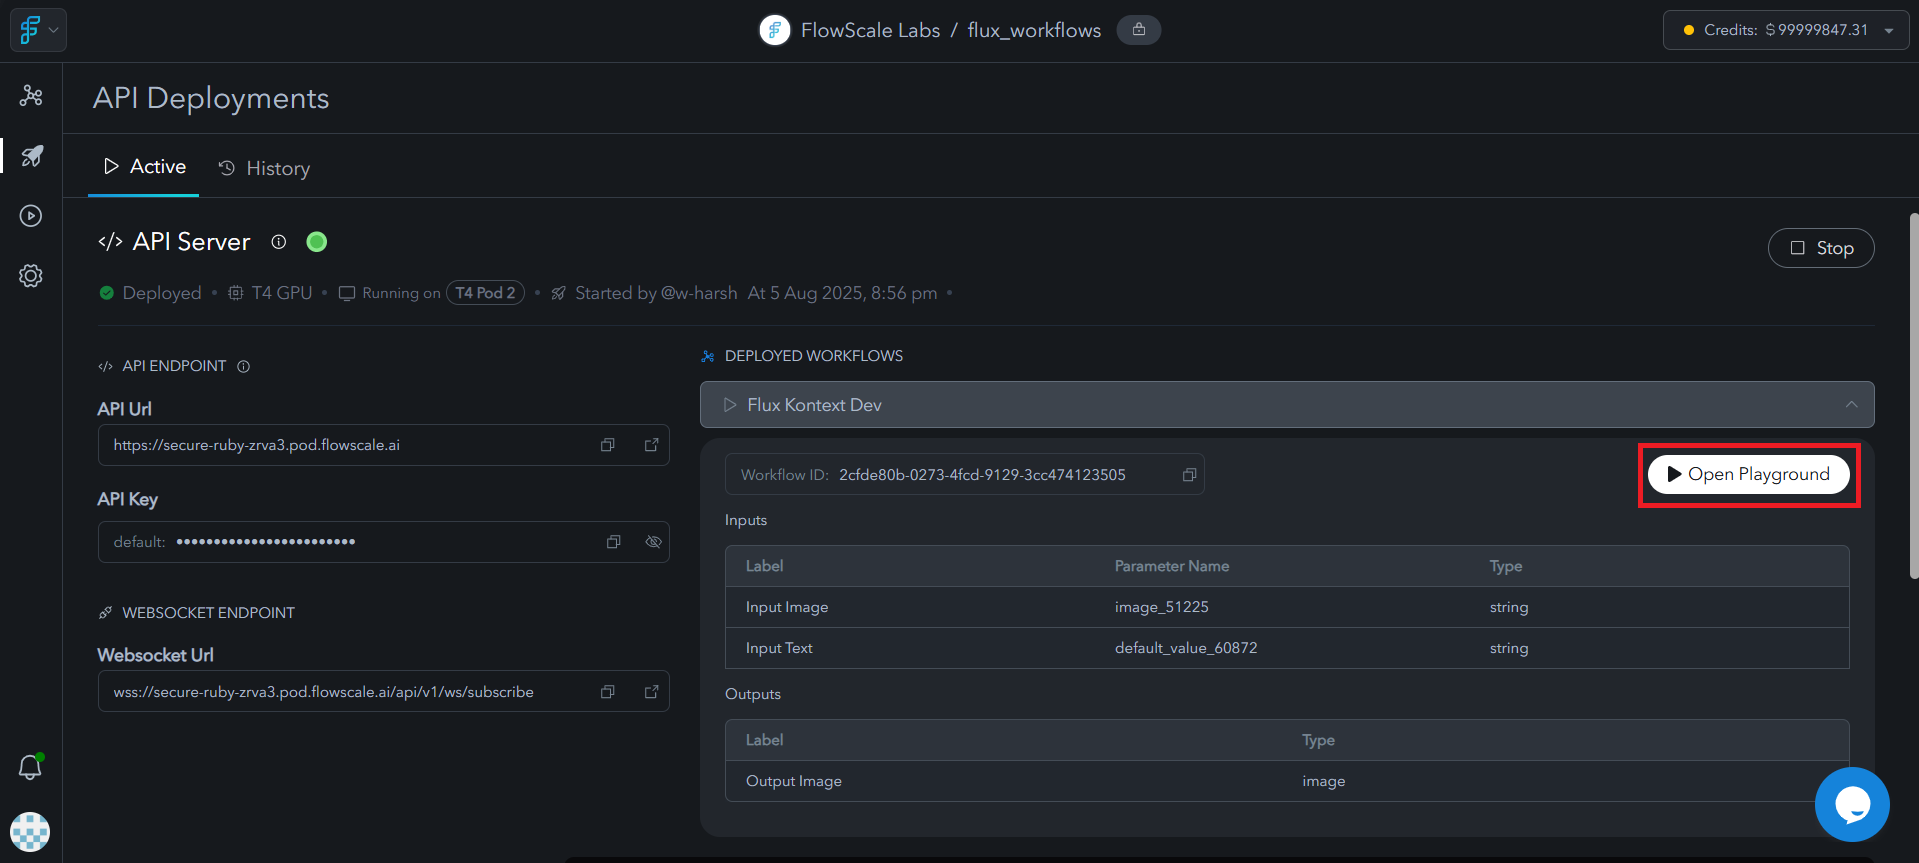 {/* Image Description for Team: Screenshot of main API Server interface showing workflow list with status indicators and playground access pathway */}
## Playground Interface
### Interface Design: Complexity Hidden, Power Preserved
**Here's where thoughtful design shines:** Your playground presents a clean, intuitive interface that hides all the ComfyUI complexity while preserving every bit of your workflow's creative power.
**Design philosophy:** Users see only what they need to control, in language they understand, with guardrails that prevent mistakes. Your sophisticated AI logic becomes as approachable as any consumer web application.
**Input Controls**
* Parameter fields based on your workflow configuration
* Input types match your FlowScale I/O nodes (text fields, sliders, image uploads)
* Default values pre-filled from your workflow settings
* **Generate button** at the bottom to execute the workflow
**Results Display**
* Output sections for each configured output node
* Real-time display of generated content (images, text, etc.)
* Download options for generated files
* Generation status and progress indicators
{/* Image Description for Team: Screenshot of main API Server interface showing workflow list with status indicators and playground access pathway */}
## Playground Interface
### Interface Design: Complexity Hidden, Power Preserved
**Here's where thoughtful design shines:** Your playground presents a clean, intuitive interface that hides all the ComfyUI complexity while preserving every bit of your workflow's creative power.
**Design philosophy:** Users see only what they need to control, in language they understand, with guardrails that prevent mistakes. Your sophisticated AI logic becomes as approachable as any consumer web application.
**Input Controls**
* Parameter fields based on your workflow configuration
* Input types match your FlowScale I/O nodes (text fields, sliders, image uploads)
* Default values pre-filled from your workflow settings
* **Generate button** at the bottom to execute the workflow
**Results Display**
* Output sections for each configured output node
* Real-time display of generated content (images, text, etc.)
* Download options for generated files
* Generation status and progress indicators
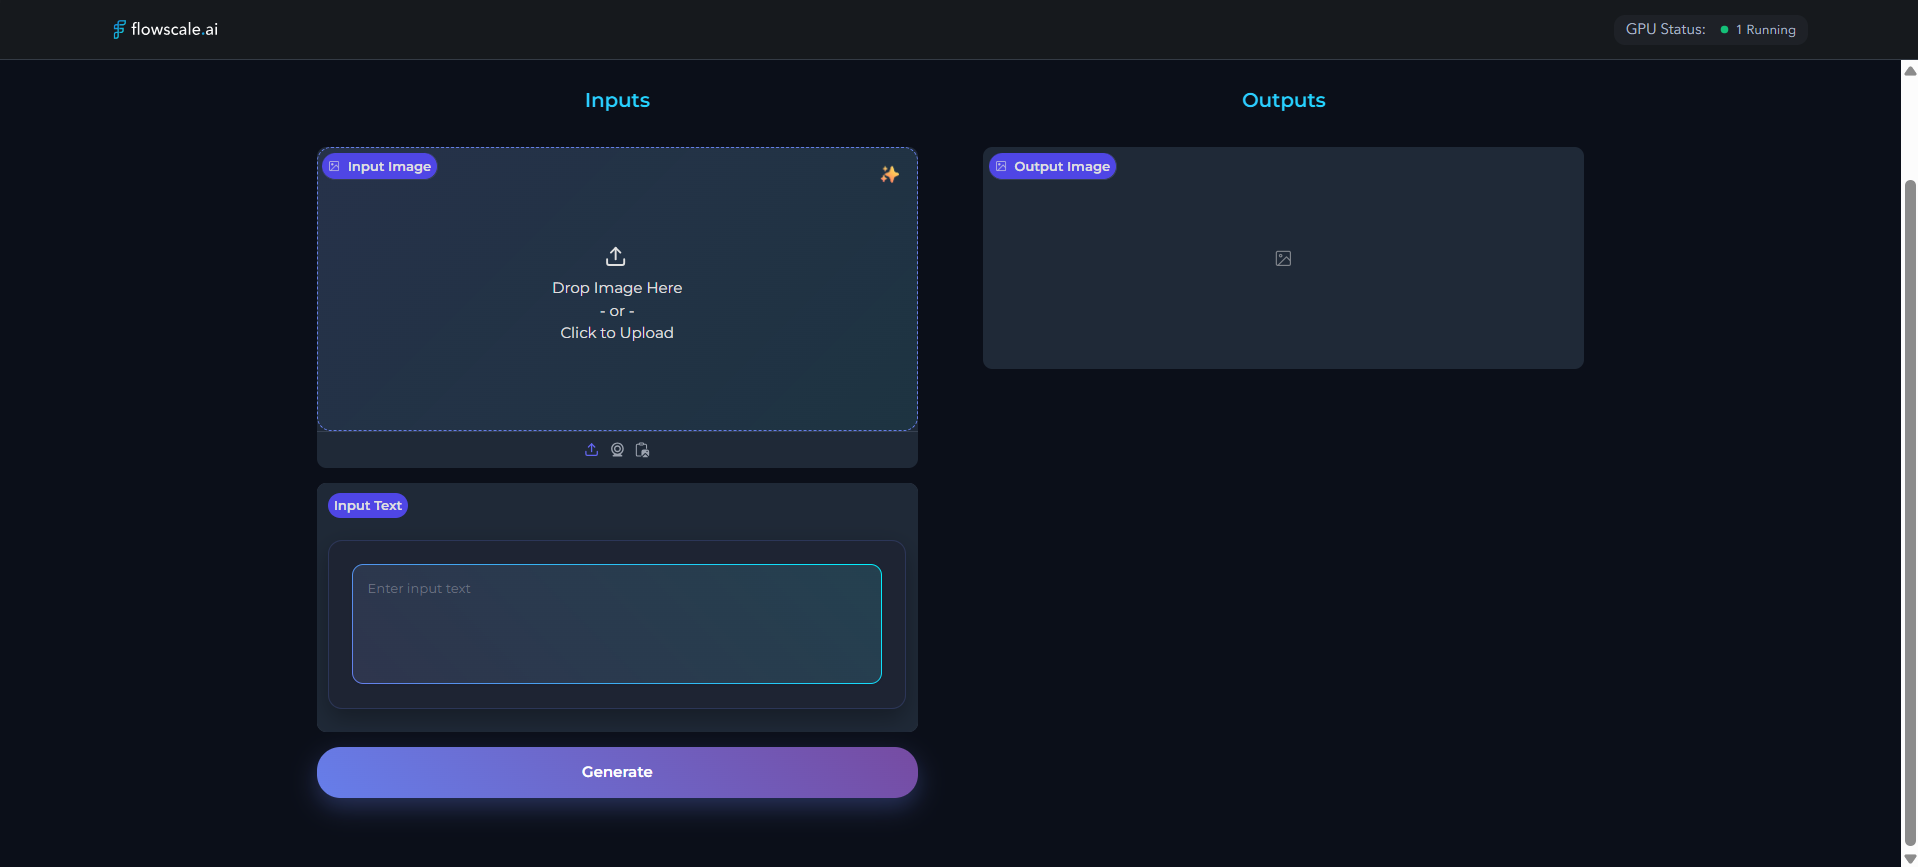 {/* Image Description for Team: Screenshot of detailed playground interface showing professional web app with intuitive controls and real-time feedback */}
### Input Field Types
The input fields in your playground directly correspond to the FlowScale I/O nodes you configured:
| Input Node Type | Playground Control | Description |
| --------------------- | ------------------ | --------------------------------------- |
| **\[FS] InputText** | Text area/field | Multi-line or single-line text input |
| **\[FS] InputImage** | File upload | Drag-and-drop or click to upload images |
| **\[FS] InputNumber** | Number input | Numeric field with validation |
| **\[FS] InputSlider** | Range slider | Interactive slider with min/max values |
💡 **Lightbulb Moment:** The input fields you see are exactly the parameters you chose to expose when configuring your workflow. This is where your thoughtful I/O design pays off—users see an intuitive interface because you made intentional choices about what to show and what to keep internal.
**Interface refinement:** If the playground doesn't feel quite right, you can always refine your [workflow I/O configuration](/deploy-api/configuration) to better match your users' needs. Great interfaces evolve through real user feedback.
## GPU Status Monitoring
### Understanding GPU States
The top-right corner of every playground displays real-time GPU status information:
**Gray indicator**: GPU is ready and waiting for requests. Fastest response time for new generations.
**Green indicator**: GPU is actively processing your request. Generation in progress.
**Orange indicator**: GPU is warming up and loading models. First request after idle period.
{/* Image Description for Team: Screenshot of detailed playground interface showing professional web app with intuitive controls and real-time feedback */}
### Input Field Types
The input fields in your playground directly correspond to the FlowScale I/O nodes you configured:
| Input Node Type | Playground Control | Description |
| --------------------- | ------------------ | --------------------------------------- |
| **\[FS] InputText** | Text area/field | Multi-line or single-line text input |
| **\[FS] InputImage** | File upload | Drag-and-drop or click to upload images |
| **\[FS] InputNumber** | Number input | Numeric field with validation |
| **\[FS] InputSlider** | Range slider | Interactive slider with min/max values |
💡 **Lightbulb Moment:** The input fields you see are exactly the parameters you chose to expose when configuring your workflow. This is where your thoughtful I/O design pays off—users see an intuitive interface because you made intentional choices about what to show and what to keep internal.
**Interface refinement:** If the playground doesn't feel quite right, you can always refine your [workflow I/O configuration](/deploy-api/configuration) to better match your users' needs. Great interfaces evolve through real user feedback.
## GPU Status Monitoring
### Understanding GPU States
The top-right corner of every playground displays real-time GPU status information:
**Gray indicator**: GPU is ready and waiting for requests. Fastest response time for new generations.
**Green indicator**: GPU is actively processing your request. Generation in progress.
**Orange indicator**: GPU is warming up and loading models. First request after idle period.
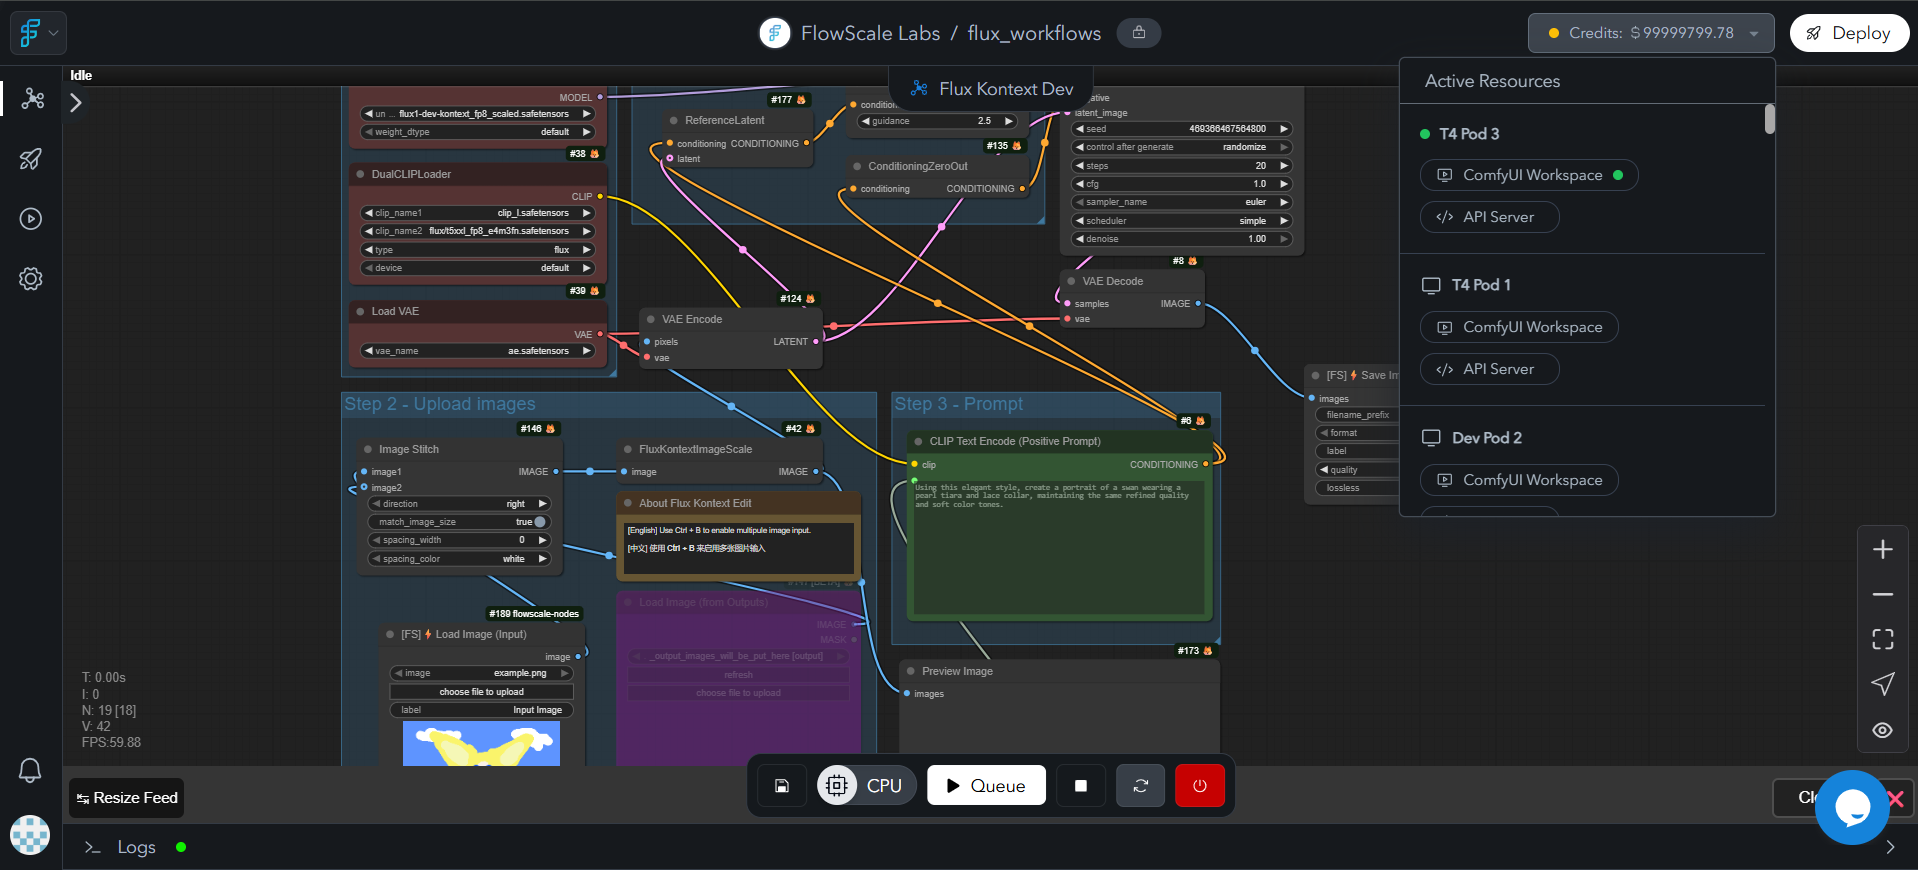 ### Performance Implications
* **Response Time**: Immediate (\< 1 second to start)
* **Best For**: Interactive testing and real-time workflows
* **Cost**: Active compute resources maintained
* **Response Time**: 30-120 seconds initial delay
* **Occurs When**: First request after period of inactivity
* **Best For**: Batch processing and non-time-sensitive tasks
* **Cost**: Lower cost as resources scale to zero when unused
* **Response Time**: Depends on workflow complexity
* **Queue Behavior**: Additional requests queue until completion
* **Best For**: Sequential generation tasks
* **Monitoring**: Progress indicators show generation status
## Using the Playground
### Running Your Workflow
Fill in the required input fields on the left side:
* Enter text prompts, descriptions, or parameters
* Upload reference images if your workflow requires them
* Adjust numeric values and sliders to your preferences
Click the **Generate** button at the bottom of the left column to start the workflow
Watch the GPU status indicator and any progress bars that appear during generation
Generated outputs appear in the right column as they become available
### Generation Process
During generation, you'll see:
* **Progress indicators** showing workflow execution stages
* **GPU status updates** reflecting current processing state
* **Partial results** appearing as they're generated (for multi-step workflows)
* **Completion notifications** when generation finishes
Generation time varies based on workflow complexity, model size, and current GPU state. Simple text workflows may complete in seconds, while high-resolution image generation can take several minutes.
## Sharing and Collaboration
### Shareable Links
Every playground has a unique, shareable URL that enables team collaboration:
**Share with colleagues** who need to test or use your workflow without ComfyUI knowledge
**Present to stakeholders** with a clean, professional interface that hides technical complexity
**Enable creative teams** to experiment with parameters and generate variations
**Facilitate testing** by non-technical team members for validation and feedback
### Sharing Best Practices
Verify your playground works correctly with various input combinations
Provide guidance on what inputs work best for your specific workflow
Configure sensible default values so users can generate results immediately
**Security Note**: Playground links provide access to your deployed workflow. Only share with trusted team members and consider implementing access controls for sensitive workflows.
## Playground Benefits
### For Technical Teams
* Test parameter combinations quickly without ComfyUI complexity
* Iterate on workflow improvements with immediate feedback
* Validate configuration changes before API integration
* Systematic testing of edge cases and input variations
* Documentation of expected behaviors and outputs
* Regression testing when updating workflow versions
### For Non-Technical Users
* Experiment with AI-generated content without technical barriers
* Discover optimal parameter settings through intuitive controls
* Generate variations and iterations for creative projects
* Streamlined workflow for regular content generation
* Consistent results through pre-configured parameters
* Immediate access to generated assets with download options
## Integration with Development Workflow
### From Playground to Production
Use the playground to validate workflow behavior and optimal parameters
Record successful parameter combinations and expected outputs
Use the playground results to inform your API integration approach
Translate playground interactions into programmatic API calls using [SDKs](/deploy-api/sdk/sdk-python)
### API Equivalent
Every playground interaction has a corresponding API call. Use the playground to:
* **Validate request formats** before writing API integration code
* **Test error conditions** and understand response structures
* **Optimize parameters** for your specific use case
* **Generate example requests** for API documentation
```javascript Playground to API theme={null}
// Playground interaction
{
"prompt": "A beautiful sunset over mountains",
"steps": 25,
"width": 1024,
"height": 1024
}
// Equivalent API call
const response = await fetch('/api/v1/workflows/run', {
method: 'POST',
headers: {
'Authorization': 'Bearer your-api-key',
'Content-Type': 'application/json'
},
body: JSON.stringify({
workflow_id: 'wf_abc123',
inputs: {
prompt: "A beautiful sunset over mountains",
steps: 25,
width: 1024,
height: 1024
}
})
});
```
## Next Steps
Integrate playground-tested workflows into applications via code
### Performance Implications
* **Response Time**: Immediate (\< 1 second to start)
* **Best For**: Interactive testing and real-time workflows
* **Cost**: Active compute resources maintained
* **Response Time**: 30-120 seconds initial delay
* **Occurs When**: First request after period of inactivity
* **Best For**: Batch processing and non-time-sensitive tasks
* **Cost**: Lower cost as resources scale to zero when unused
* **Response Time**: Depends on workflow complexity
* **Queue Behavior**: Additional requests queue until completion
* **Best For**: Sequential generation tasks
* **Monitoring**: Progress indicators show generation status
## Using the Playground
### Running Your Workflow
Fill in the required input fields on the left side:
* Enter text prompts, descriptions, or parameters
* Upload reference images if your workflow requires them
* Adjust numeric values and sliders to your preferences
Click the **Generate** button at the bottom of the left column to start the workflow
Watch the GPU status indicator and any progress bars that appear during generation
Generated outputs appear in the right column as they become available
### Generation Process
During generation, you'll see:
* **Progress indicators** showing workflow execution stages
* **GPU status updates** reflecting current processing state
* **Partial results** appearing as they're generated (for multi-step workflows)
* **Completion notifications** when generation finishes
Generation time varies based on workflow complexity, model size, and current GPU state. Simple text workflows may complete in seconds, while high-resolution image generation can take several minutes.
## Sharing and Collaboration
### Shareable Links
Every playground has a unique, shareable URL that enables team collaboration:
**Share with colleagues** who need to test or use your workflow without ComfyUI knowledge
**Present to stakeholders** with a clean, professional interface that hides technical complexity
**Enable creative teams** to experiment with parameters and generate variations
**Facilitate testing** by non-technical team members for validation and feedback
### Sharing Best Practices
Verify your playground works correctly with various input combinations
Provide guidance on what inputs work best for your specific workflow
Configure sensible default values so users can generate results immediately
**Security Note**: Playground links provide access to your deployed workflow. Only share with trusted team members and consider implementing access controls for sensitive workflows.
## Playground Benefits
### For Technical Teams
* Test parameter combinations quickly without ComfyUI complexity
* Iterate on workflow improvements with immediate feedback
* Validate configuration changes before API integration
* Systematic testing of edge cases and input variations
* Documentation of expected behaviors and outputs
* Regression testing when updating workflow versions
### For Non-Technical Users
* Experiment with AI-generated content without technical barriers
* Discover optimal parameter settings through intuitive controls
* Generate variations and iterations for creative projects
* Streamlined workflow for regular content generation
* Consistent results through pre-configured parameters
* Immediate access to generated assets with download options
## Integration with Development Workflow
### From Playground to Production
Use the playground to validate workflow behavior and optimal parameters
Record successful parameter combinations and expected outputs
Use the playground results to inform your API integration approach
Translate playground interactions into programmatic API calls using [SDKs](/deploy-api/sdk/sdk-python)
### API Equivalent
Every playground interaction has a corresponding API call. Use the playground to:
* **Validate request formats** before writing API integration code
* **Test error conditions** and understand response structures
* **Optimize parameters** for your specific use case
* **Generate example requests** for API documentation
```javascript Playground to API theme={null}
// Playground interaction
{
"prompt": "A beautiful sunset over mountains",
"steps": 25,
"width": 1024,
"height": 1024
}
// Equivalent API call
const response = await fetch('/api/v1/workflows/run', {
method: 'POST',
headers: {
'Authorization': 'Bearer your-api-key',
'Content-Type': 'application/json'
},
body: JSON.stringify({
workflow_id: 'wf_abc123',
inputs: {
prompt: "A beautiful sunset over mountains",
steps: 25,
width: 1024,
height: 1024
}
})
});
```
## Next Steps
Integrate playground-tested workflows into applications via code