> ## Documentation Index
> Fetch the complete documentation index at: https://docs.flowscale.ai/llms.txt
> Use this file to discover all available pages before exploring further.
# Deploy Workflows
> Transform your ComfyUI workflows into production-ready APIs and interactive applications
import DeploymentTroubleshooting from "/snippets/troubleshooting/deployment.mdx";
Deploy your ComfyUI workflows as production APIs with automatic documentation, interactive interfaces, and enterprise scaling.
**Haven't set up your workflow yet?** You'll need to complete the
[Import/Create Workflows guide](/getting-started/import-create-workflows)
first. The deployment process requires a fully configured, tested workflow as
its foundation.
## Prerequisites
Ensure your workflow is ready for deployment, you can check which workflows are ready to deploy from the workflows bar. The workflows with green check mark are ready to deploy:
Run your workflow successfully in ComfyUI workspace to verify functionality
Save the workflow after successful execution to create a stable version
Verify all models and custom nodes are properly configured
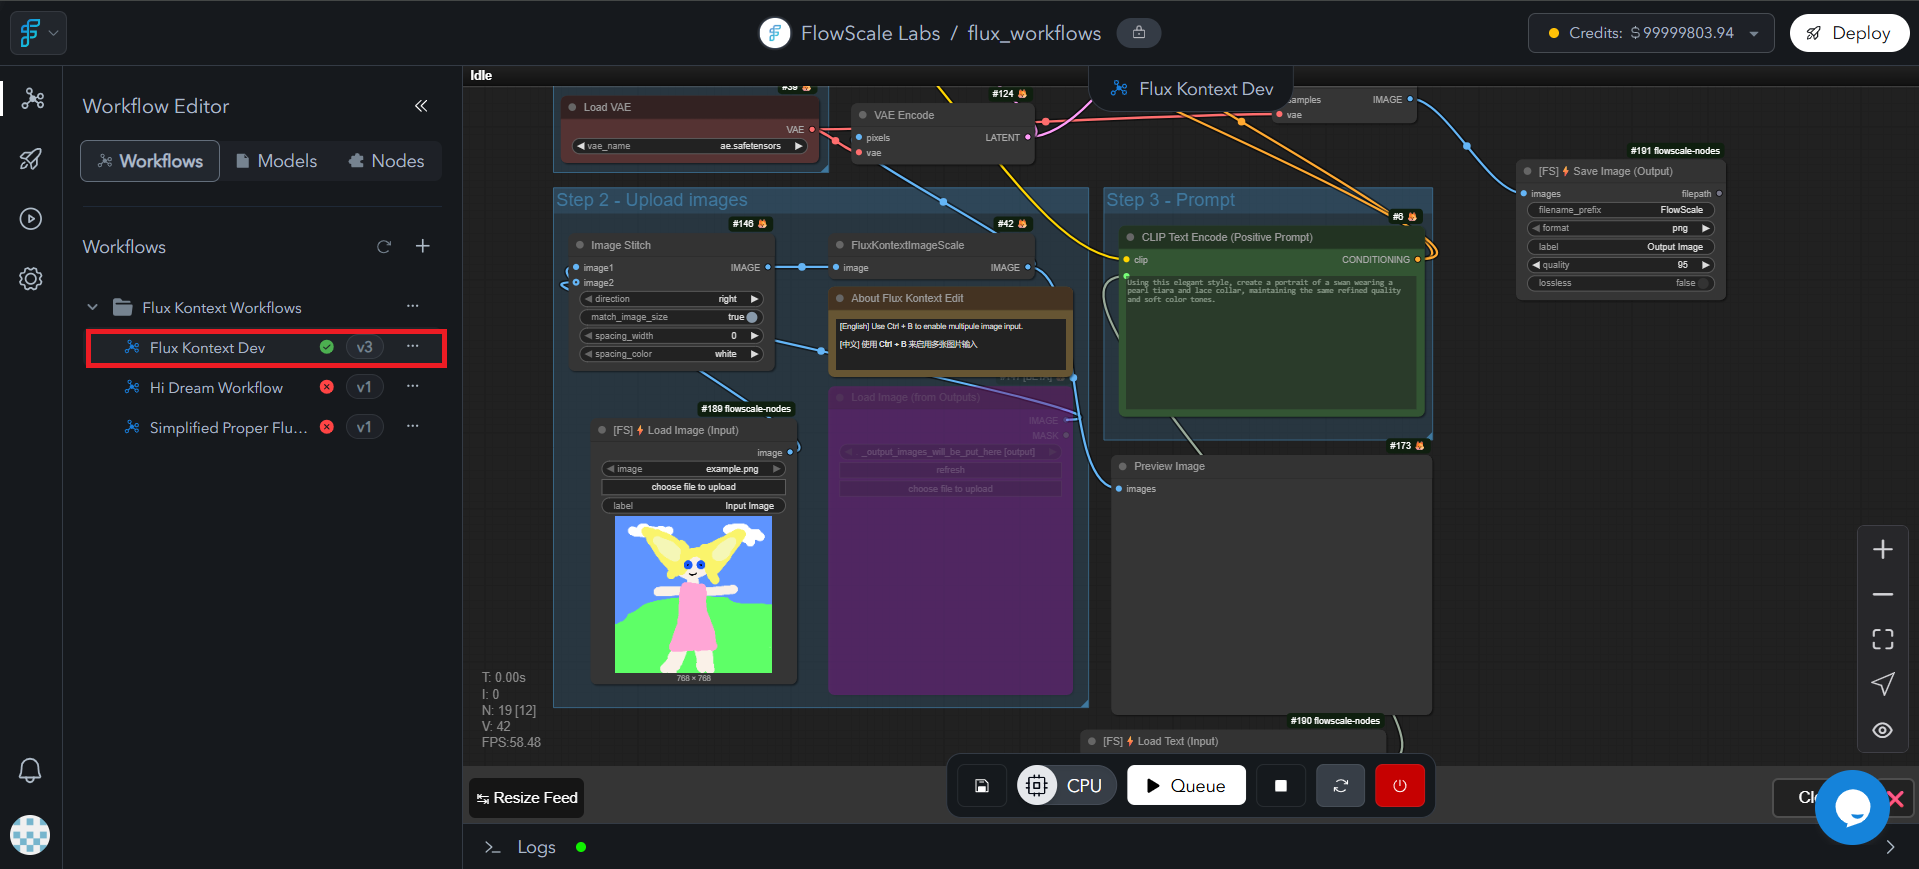 **Important**: The workflow must run successfully at least once in the ComfyUI
workspace before deployment. This ensures all models and custom nodes are
properly configured and the platform can verify the workflow's functionality.
## Configure API Interface
Transform your workflow into a standardized API by defining inputs and outputs:
* Create intuitive parameters for users
* Generate automatic documentation
* Build interactive interfaces
* Establish reliable API contracts
By default, workflows are not configured for deployment. You'll notice a **red
cross mark** next to unconfigured workflows in your project's workflow
sidebar.
Configure which inputs are user-controllable and how outputs should be formatted for different consumer types.
### Configuration Methods
There are two primary ways to configure a workflow for deployment:
Use specialized FlowScale I/O nodes that are designed for deployment
configuration.
Use the advanced configuration interface for complex setups. [Read more
about advanced API
configuration](/deploy-api/configuration#method-2%3A-advanced-api-configuration).
## FlowScale I/O Nodes
Use FlowScale I/O nodes to define API inputs and outputs. Choose which controls users need without exposing unnecessary complexity.
### Adding Input Nodes
Double-click on an empty area in the ComfyUI workspace to open the node
search
Type one of the following input node names: - **InputText** - For text
prompts and string inputs - **InputImage** - For image uploads -
**InputNumber** - For numeric parameters - **InputSlider** - For slider
controls
Choose nodes with the **"\[FS]"** prefix, indicating they are
FlowScale-specific nodes
Connect these input nodes to your workflow where external inputs are needed
**Important**: The workflow must run successfully at least once in the ComfyUI
workspace before deployment. This ensures all models and custom nodes are
properly configured and the platform can verify the workflow's functionality.
## Configure API Interface
Transform your workflow into a standardized API by defining inputs and outputs:
* Create intuitive parameters for users
* Generate automatic documentation
* Build interactive interfaces
* Establish reliable API contracts
By default, workflows are not configured for deployment. You'll notice a **red
cross mark** next to unconfigured workflows in your project's workflow
sidebar.
Configure which inputs are user-controllable and how outputs should be formatted for different consumer types.
### Configuration Methods
There are two primary ways to configure a workflow for deployment:
Use specialized FlowScale I/O nodes that are designed for deployment
configuration.
Use the advanced configuration interface for complex setups. [Read more
about advanced API
configuration](/deploy-api/configuration#method-2%3A-advanced-api-configuration).
## FlowScale I/O Nodes
Use FlowScale I/O nodes to define API inputs and outputs. Choose which controls users need without exposing unnecessary complexity.
### Adding Input Nodes
Double-click on an empty area in the ComfyUI workspace to open the node
search
Type one of the following input node names: - **InputText** - For text
prompts and string inputs - **InputImage** - For image uploads -
**InputNumber** - For numeric parameters - **InputSlider** - For slider
controls
Choose nodes with the **"\[FS]"** prefix, indicating they are
FlowScale-specific nodes
Connect these input nodes to your workflow where external inputs are needed
![ComfyUI node search dialog displaying FlowScale-specific I/O nodes with [FS] prefix, showing input and output node categories with clear descriptions and usage examples](https://mintcdn.com/flowscaleai/_NiiTj7mXdWDjGF6/images/glossary/comfyui_flowscale_nodes.png?fit=max&auto=format&n=_NiiTj7mXdWDjGF6&q=85&s=1db0ab5be0cdaa33aa120f63c12d919e)
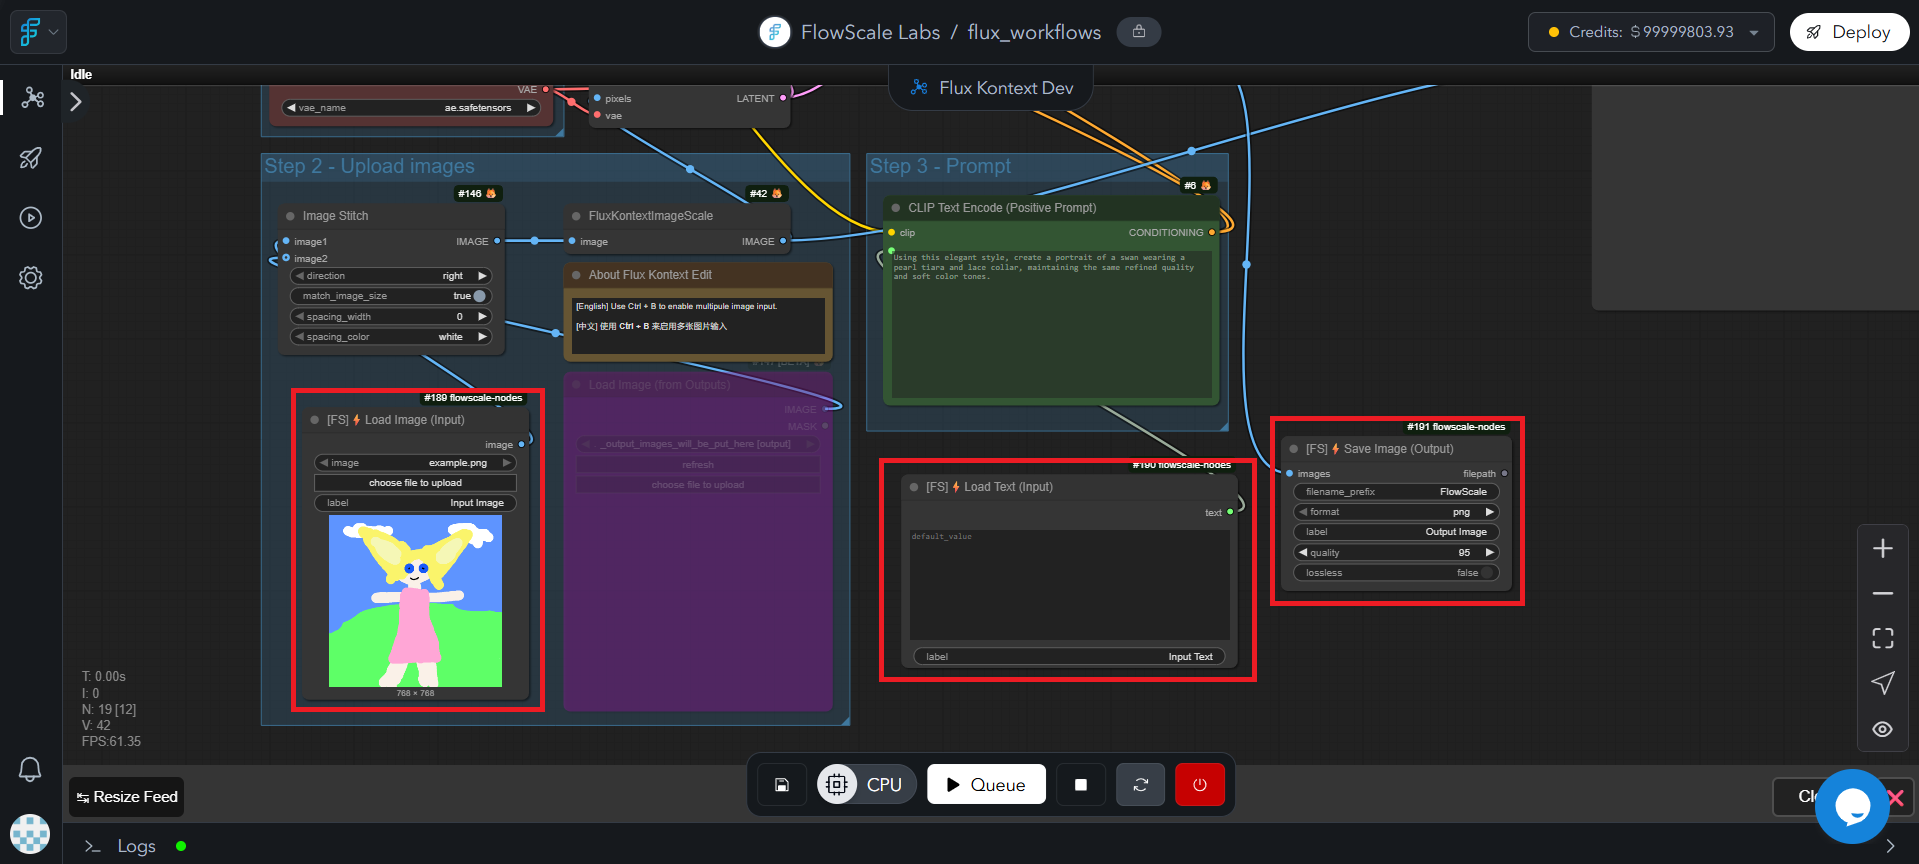 ### Adding Output Nodes
In the node search, type one of the following output node names: -
**SaveImage** - For image outputs - **SaveText** - For text outputs -
**SaveVideo** - For video outputs - **SaveAudio** - For audio outputs
Again, choose nodes with the **"\[FS]"** prefix
Connect these output nodes to capture the final results of your workflow
### Available FlowScale I/O Nodes
| Node Type | Purpose | Use Case |
| --------------------- | ---------------- | -------------------------------------- |
| **\[FS] InputText** | Text input field | Prompts, descriptions, parameters |
| **\[FS] InputImage** | Image upload | Reference images, masks, source images |
| **\[FS] InputNumber** | Numeric input | Steps, strength, dimensions |
| **\[FS] InputSlider** | Range slider | CFG scale, denoise strength |
| **\[FS] SaveImage** | Image output | Generated images, processed images |
| **\[FS] SaveText** | Text output | Generated text, metadata |
| **\[FS] SaveVideo** | Video output | Animated sequences |
| **\[FS] SaveAudio** | Audio output | Generated audio files |
### Verify Configuration
After adding FlowScale I/O nodes:
Ensure all I/O nodes are properly connected to your workflow
Click the **Save** button in the ComfyUI workspace
Look for a **green checkmark** next to your workflow in the left sidebar,
indicating successful configuration
## Deploy Workflow
Deploy your configured workflow as a production API with automatic scaling and monitoring.
### Deployment Process
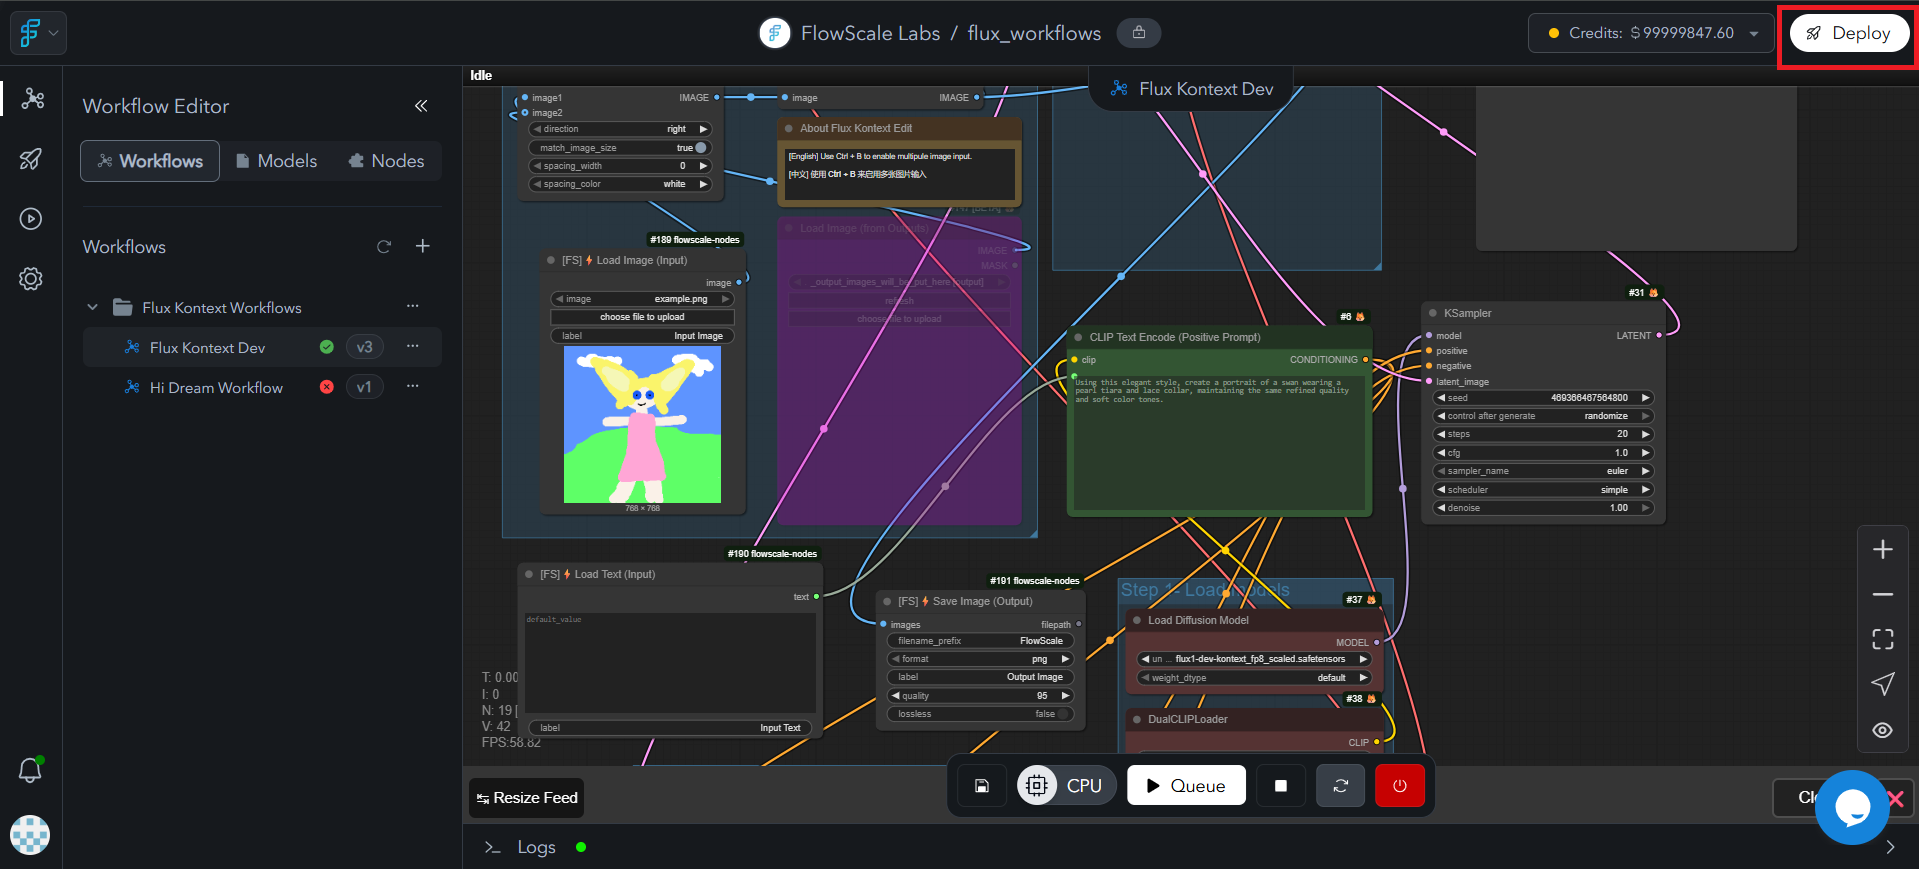
Click the **"Deploy"** button in the top-right corner of the application
### Adding Output Nodes
In the node search, type one of the following output node names: -
**SaveImage** - For image outputs - **SaveText** - For text outputs -
**SaveVideo** - For video outputs - **SaveAudio** - For audio outputs
Again, choose nodes with the **"\[FS]"** prefix
Connect these output nodes to capture the final results of your workflow
### Available FlowScale I/O Nodes
| Node Type | Purpose | Use Case |
| --------------------- | ---------------- | -------------------------------------- |
| **\[FS] InputText** | Text input field | Prompts, descriptions, parameters |
| **\[FS] InputImage** | Image upload | Reference images, masks, source images |
| **\[FS] InputNumber** | Numeric input | Steps, strength, dimensions |
| **\[FS] InputSlider** | Range slider | CFG scale, denoise strength |
| **\[FS] SaveImage** | Image output | Generated images, processed images |
| **\[FS] SaveText** | Text output | Generated text, metadata |
| **\[FS] SaveVideo** | Video output | Animated sequences |
| **\[FS] SaveAudio** | Audio output | Generated audio files |
### Verify Configuration
After adding FlowScale I/O nodes:
Ensure all I/O nodes are properly connected to your workflow
Click the **Save** button in the ComfyUI workspace
Look for a **green checkmark** next to your workflow in the left sidebar,
indicating successful configuration
## Deploy Workflow
Deploy your configured workflow as a production API with automatic scaling and monitoring.
### Deployment Process
Click the **"Deploy"** button in the top-right corner of the application
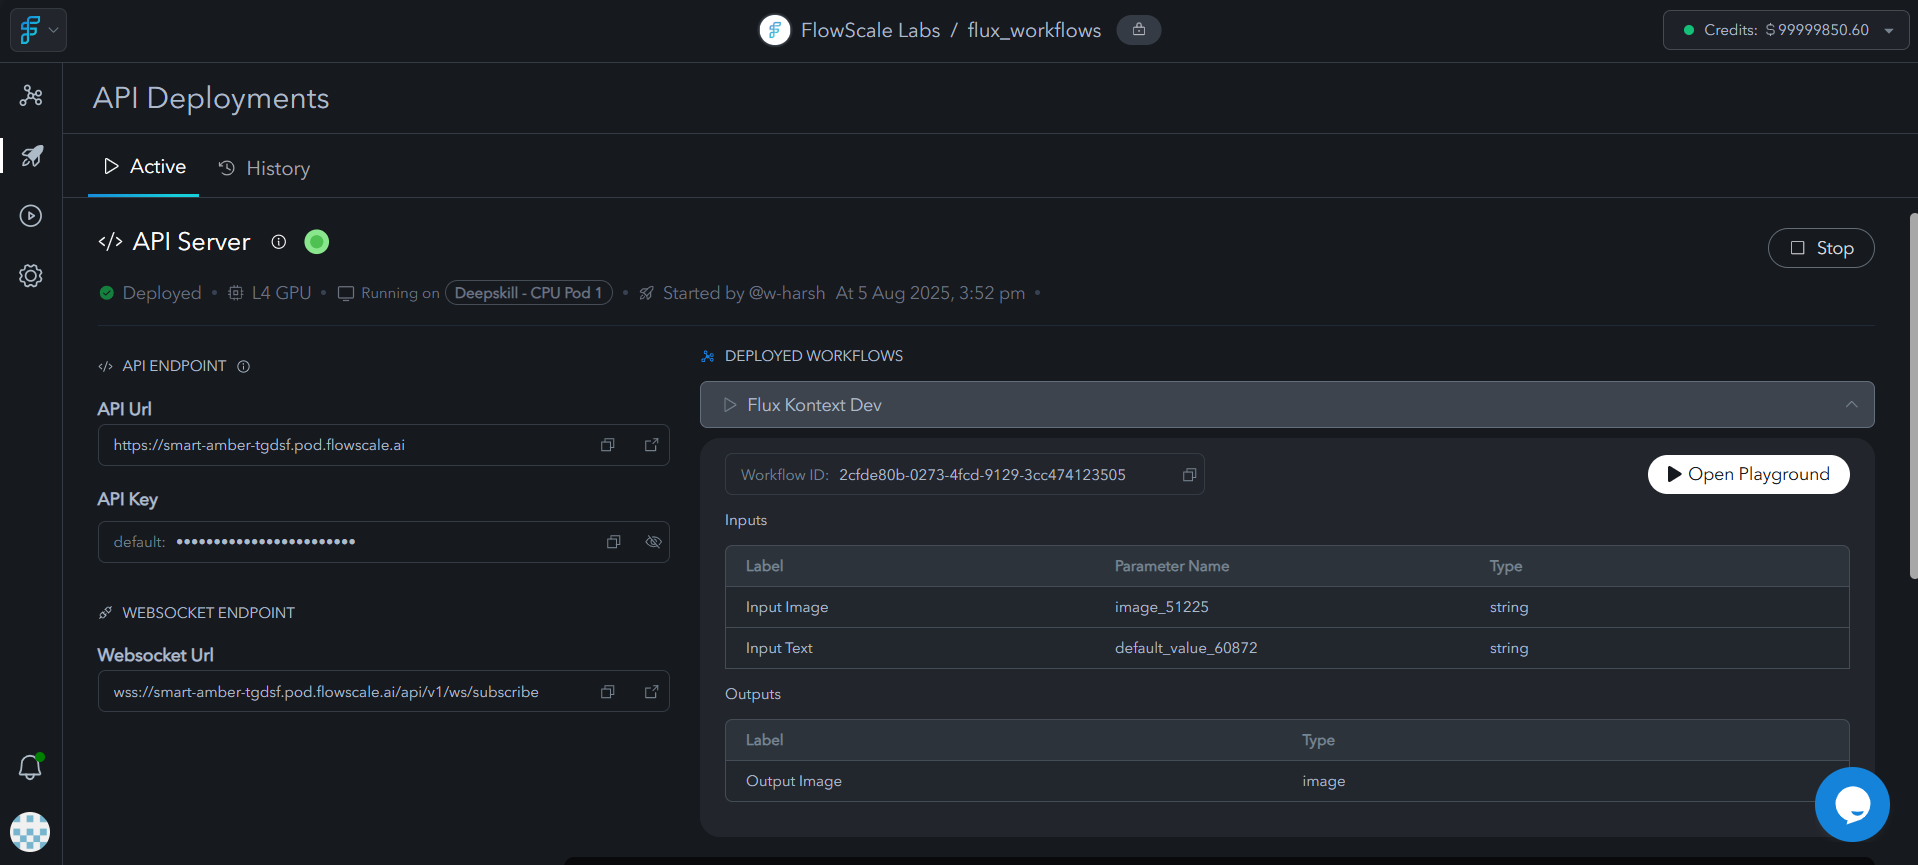
 A dialog box will appear asking you to select the Pod for deployment
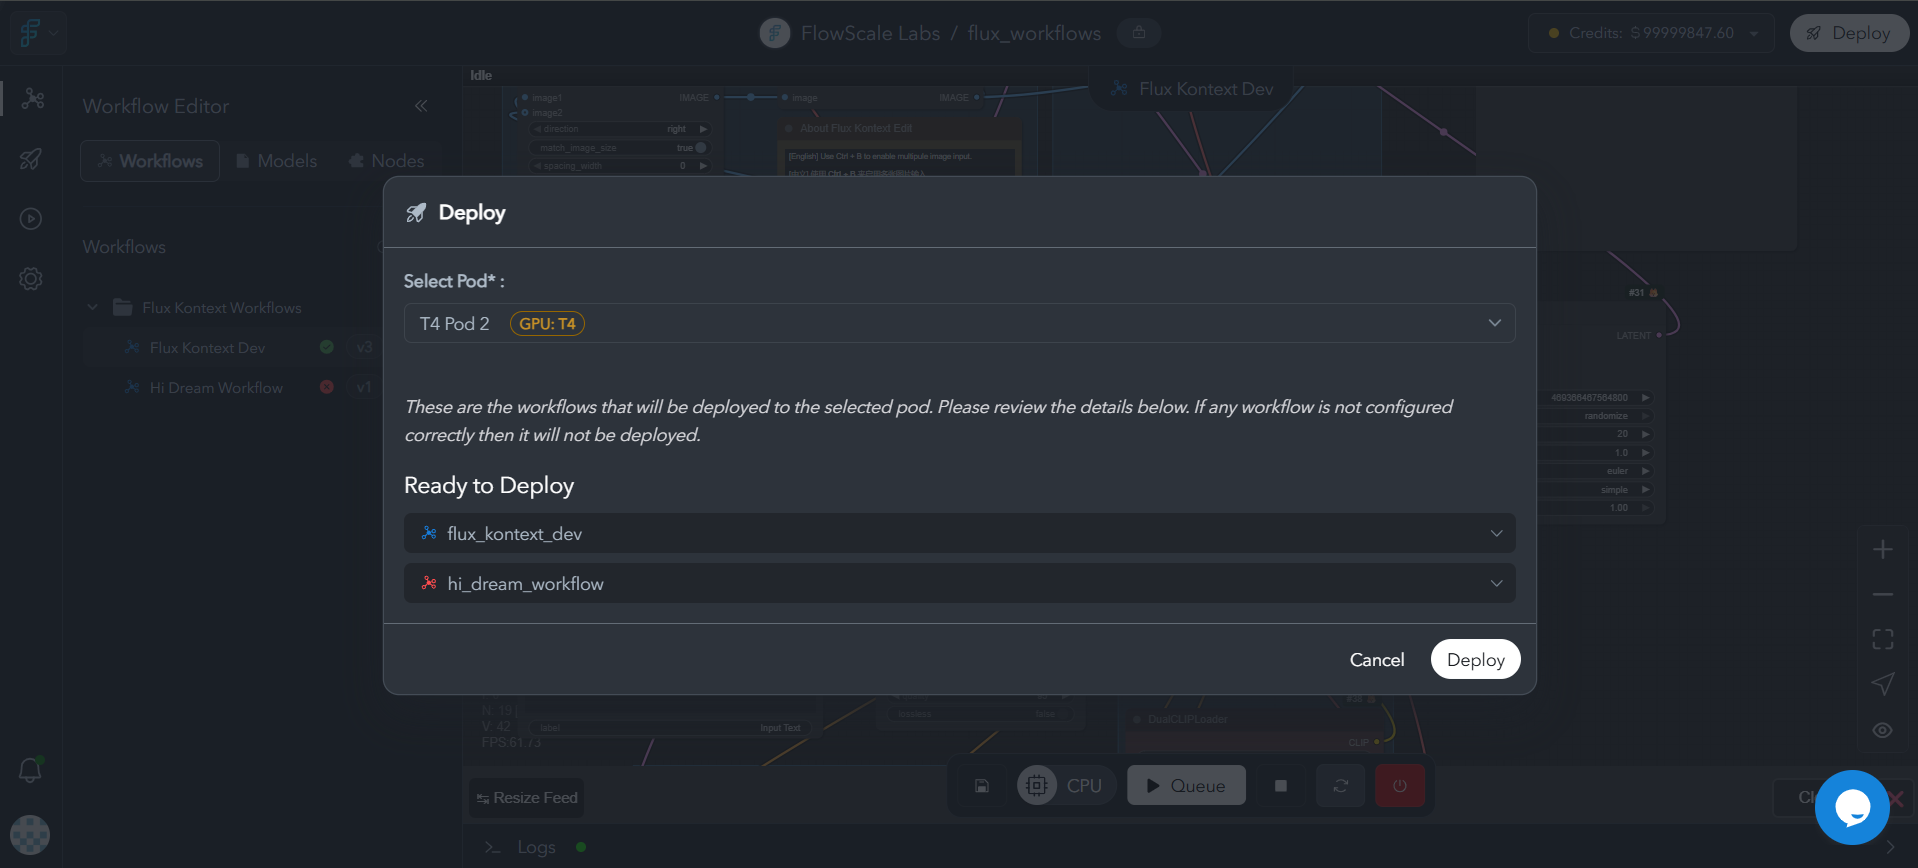 Select the appropriate pod based on your workflow requirements: - **GPU
type** needed for your models - **Memory requirements** for your workflow -
**Expected usage** patterns
Click **Deploy** to start the deployment process
Select the appropriate pod based on your workflow requirements: - **GPU
type** needed for your models - **Memory requirements** for your workflow -
**Expected usage** patterns
Click **Deploy** to start the deployment process
 For detailed information about pod types, specifications, and choosing the
right configuration for your workflow, refer to our [Pods
documentation](/getting-started/glossary/pods).
## Deployed Workflow Features
Your deployed workflow provides:
* Real-time monitoring and analytics
* Interactive API documentation
* Live testing environment
* Security and access controls
* Performance insights and metrics
For detailed information about pod types, specifications, and choosing the
right configuration for your workflow, refer to our [Pods
documentation](/getting-started/glossary/pods).
## Deployed Workflow Features
Your deployed workflow provides:
* Real-time monitoring and analytics
* Interactive API documentation
* Live testing environment
* Security and access controls
* Performance insights and metrics
 ### API Integration
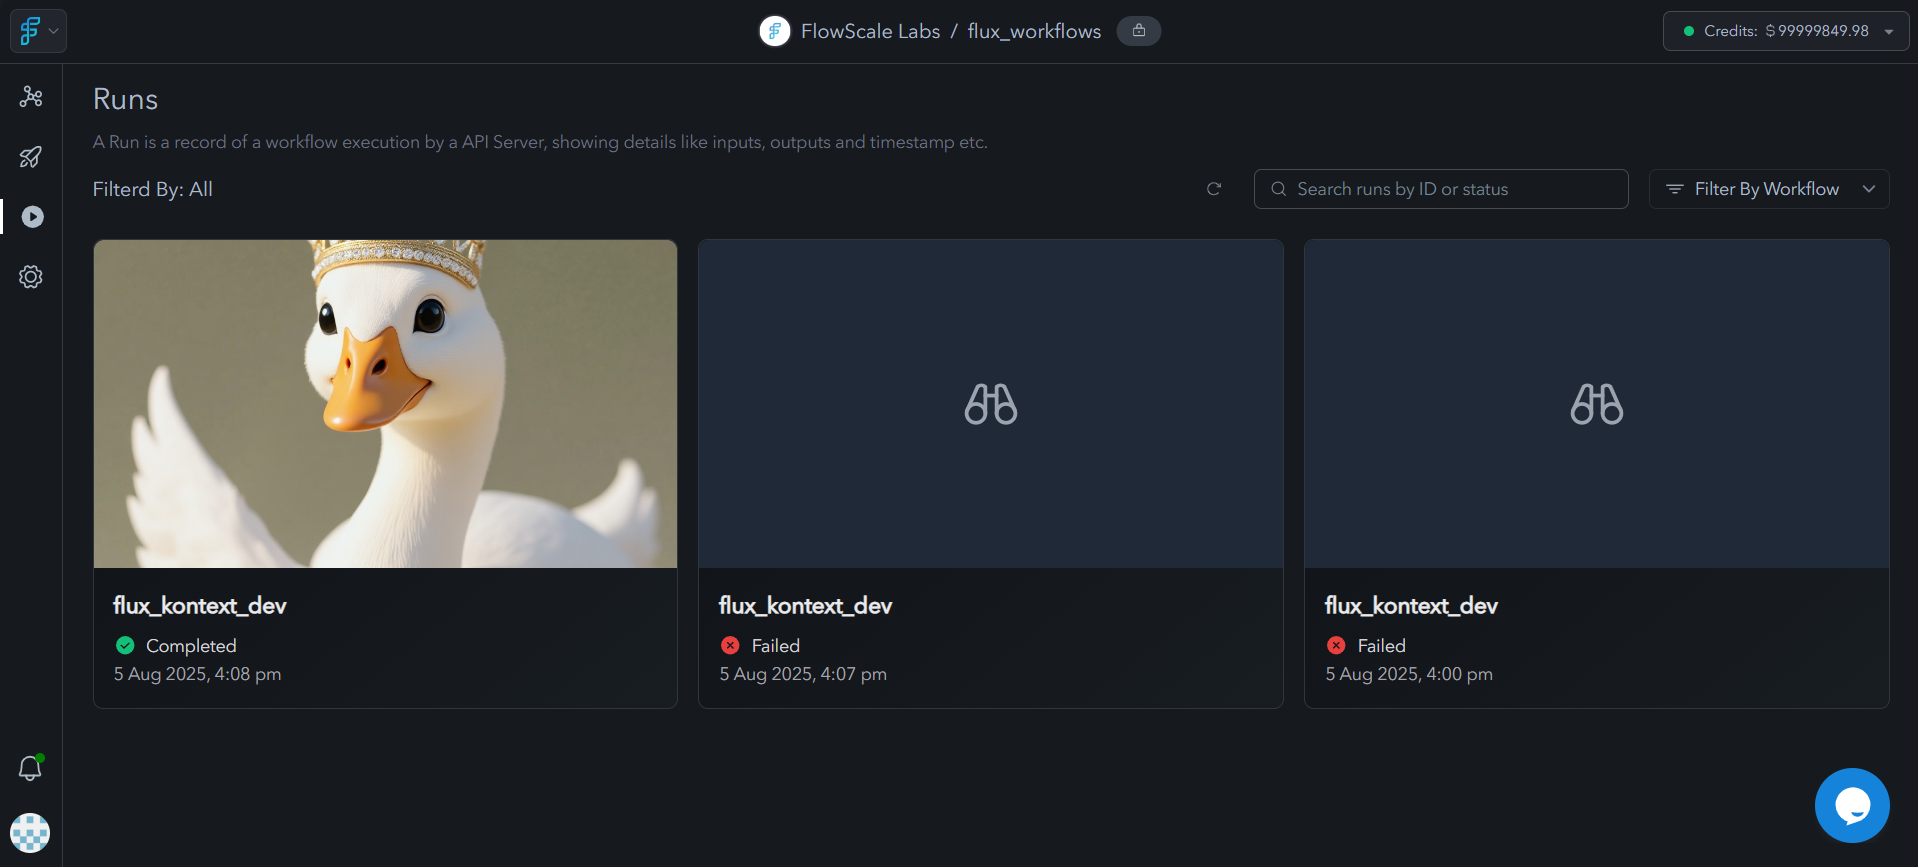
Your workflow is now accessible via REST API from any application or system:
```bash curl theme={null}
curl -X POST https://api.flowscale.ai/v1/run \
-H "Authorization: Bearer your-api-key" \
-H "Content-Type: application/json" \
-d '{
"workflow_id": "wf_abc123",
"inputs": {
"prompt": "A beautiful sunset over mountains",
"steps": 20,
"cfg": 7.5
}
}'
```
```javascript JavaScript theme={null}
const response = await fetch("https://api.flowscale.ai/v1/run", {
method: "POST",
headers: {
Authorization: "Bearer your-api-key",
"Content-Type": "application/json",
},
body: JSON.stringify({
workflow_id: "wf_abc123",
inputs: {
prompt: "A beautiful sunset over mountains",
steps: 20,
cfg: 7.5,
},
}),
});
```
```python Python theme={null}
import requests
response = requests.post(
'https://api.flowscale.ai/v1/run',
headers={
'Authorization': 'Bearer your-api-key',
'Content-Type': 'application/json'
},
json={
'workflow_id': 'wf_abc123',
'inputs': {
'prompt': 'A beautiful sunset over mountains',
'steps': 20,
'cfg': 7.5
}
}
)
```
### Interactive Playground
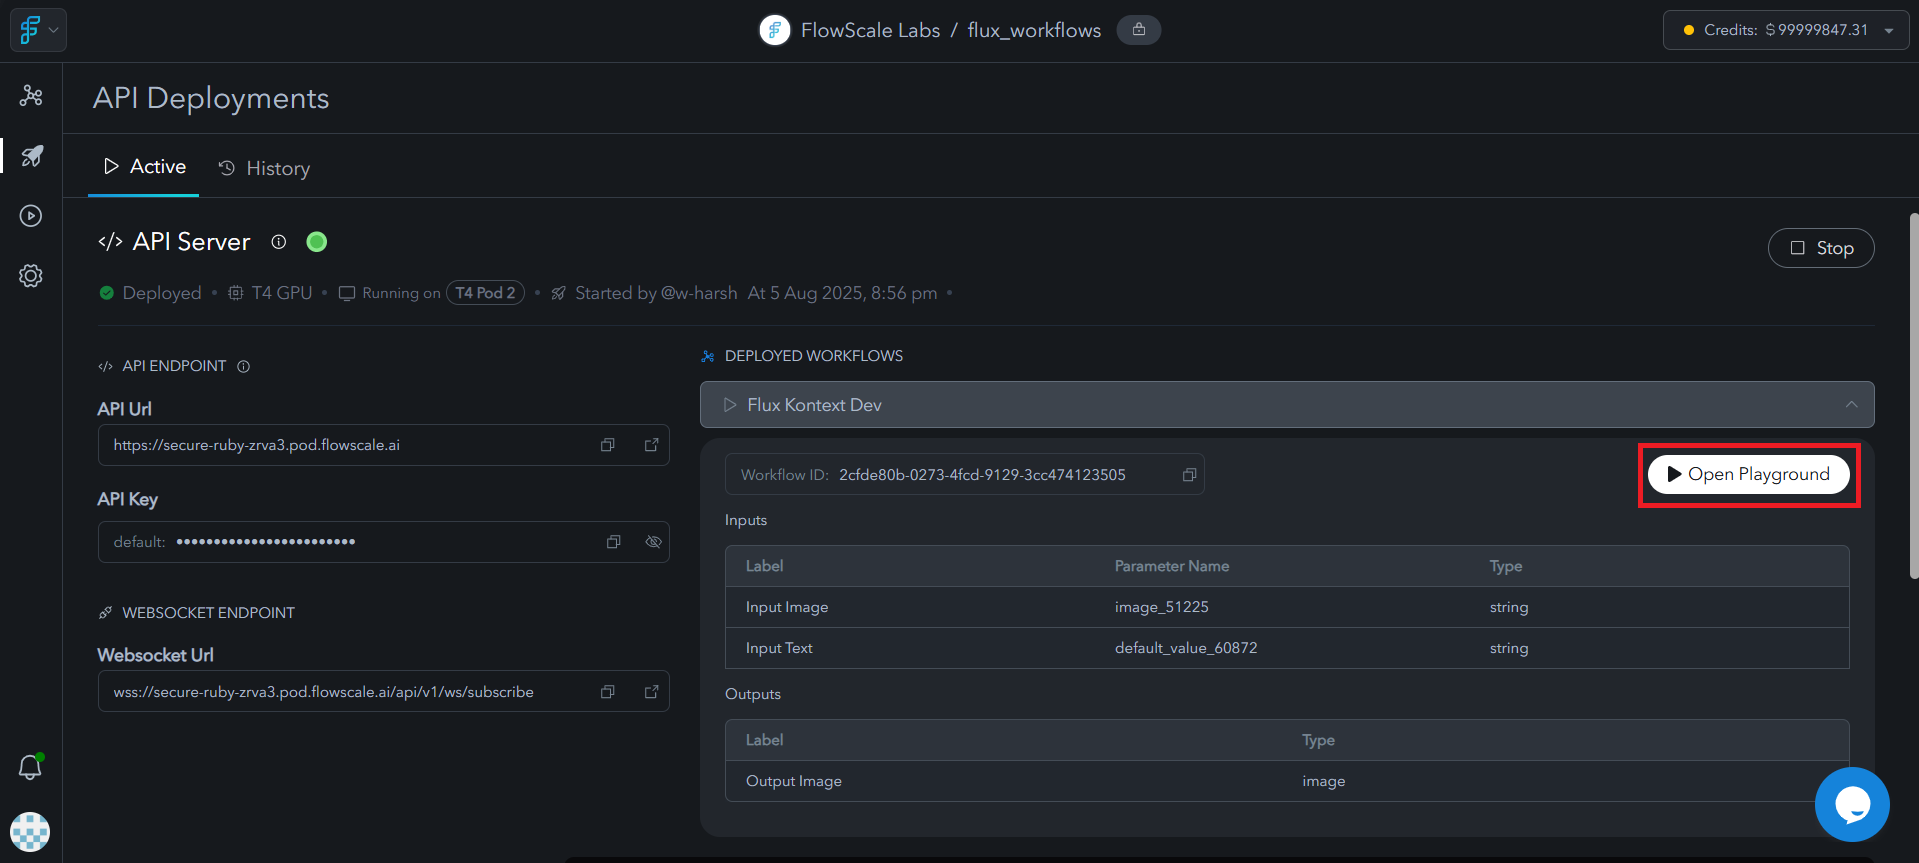
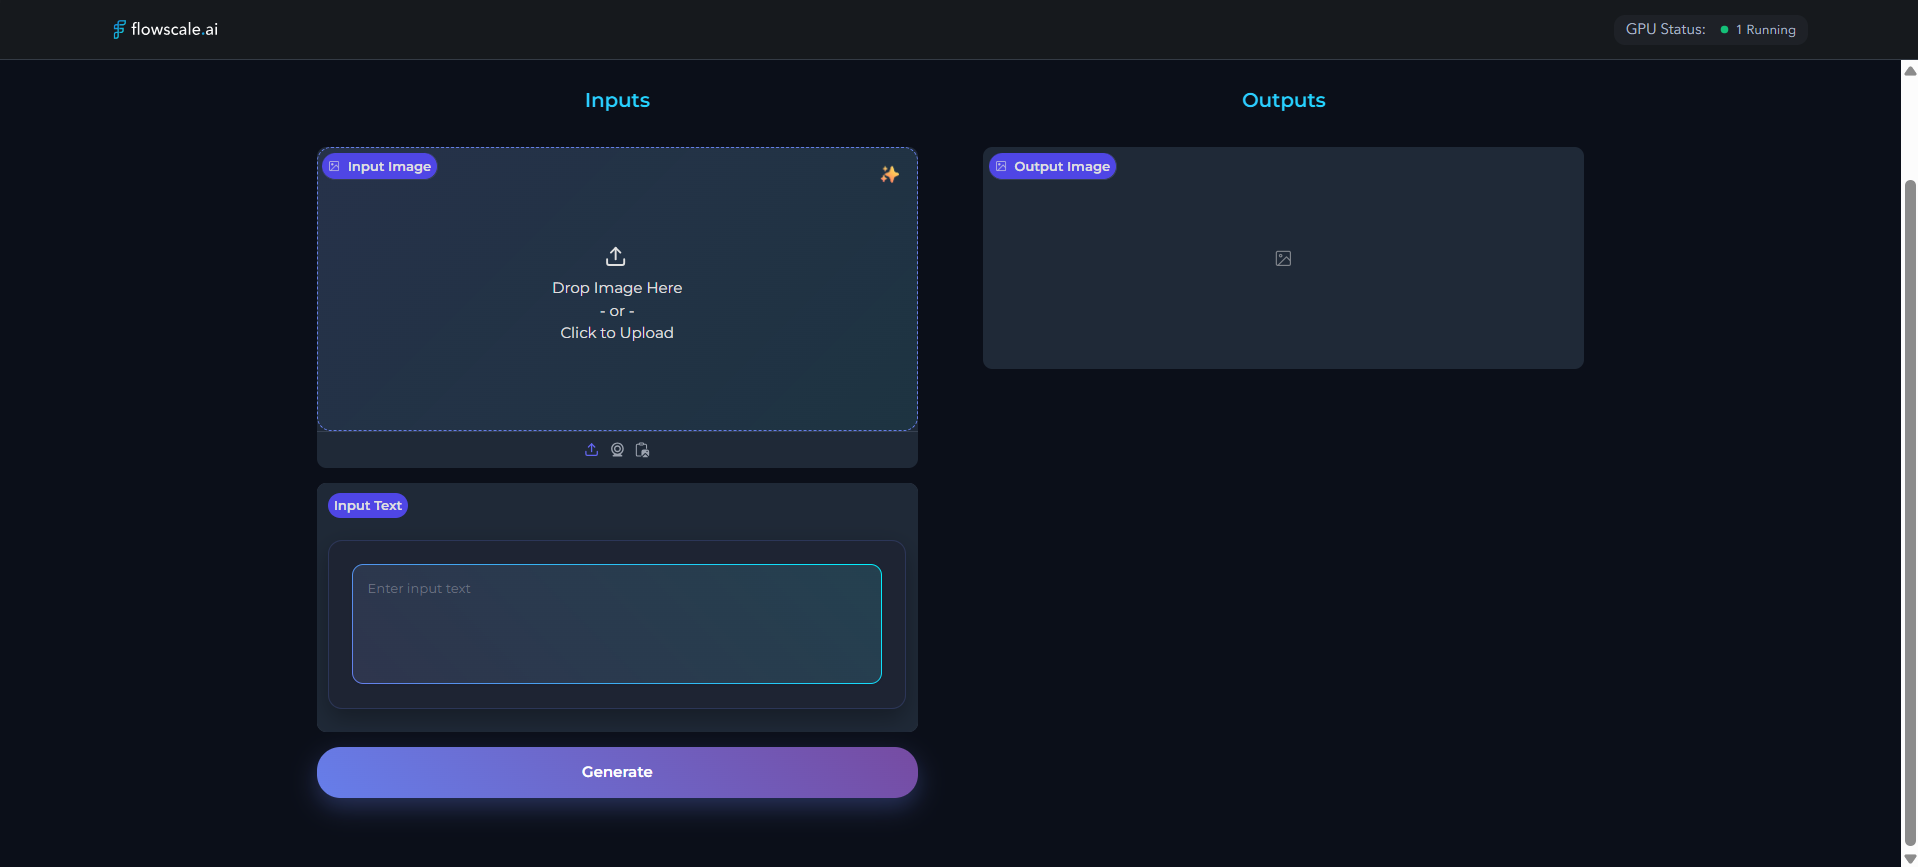
The auto-generated playground provides a user-friendly interface for non-technical users:
In the API Server page, find your deployed workflow and click **"Open
Playground"**
Use the auto-generated form to input parameters and test your workflow
Share the playground URL with team members for easy access without ComfyUI
complexity
### API Integration
Your workflow is now accessible via REST API from any application or system:
```bash curl theme={null}
curl -X POST https://api.flowscale.ai/v1/run \
-H "Authorization: Bearer your-api-key" \
-H "Content-Type: application/json" \
-d '{
"workflow_id": "wf_abc123",
"inputs": {
"prompt": "A beautiful sunset over mountains",
"steps": 20,
"cfg": 7.5
}
}'
```
```javascript JavaScript theme={null}
const response = await fetch("https://api.flowscale.ai/v1/run", {
method: "POST",
headers: {
Authorization: "Bearer your-api-key",
"Content-Type": "application/json",
},
body: JSON.stringify({
workflow_id: "wf_abc123",
inputs: {
prompt: "A beautiful sunset over mountains",
steps: 20,
cfg: 7.5,
},
}),
});
```
```python Python theme={null}
import requests
response = requests.post(
'https://api.flowscale.ai/v1/run',
headers={
'Authorization': 'Bearer your-api-key',
'Content-Type': 'application/json'
},
json={
'workflow_id': 'wf_abc123',
'inputs': {
'prompt': 'A beautiful sunset over mountains',
'steps': 20,
'cfg': 7.5
}
}
)
```
### Interactive Playground
The auto-generated playground provides a user-friendly interface for non-technical users:
In the API Server page, find your deployed workflow and click **"Open
Playground"**
Use the auto-generated form to input parameters and test your workflow
Share the playground URL with team members for easy access without ComfyUI
complexity
 Benefits of the playground interface:
* Accessible to non-technical team members
* Faster feedback cycles on actual results
* Interactive client demonstrations
* Mobile-friendly access
* User confidence through direct testing
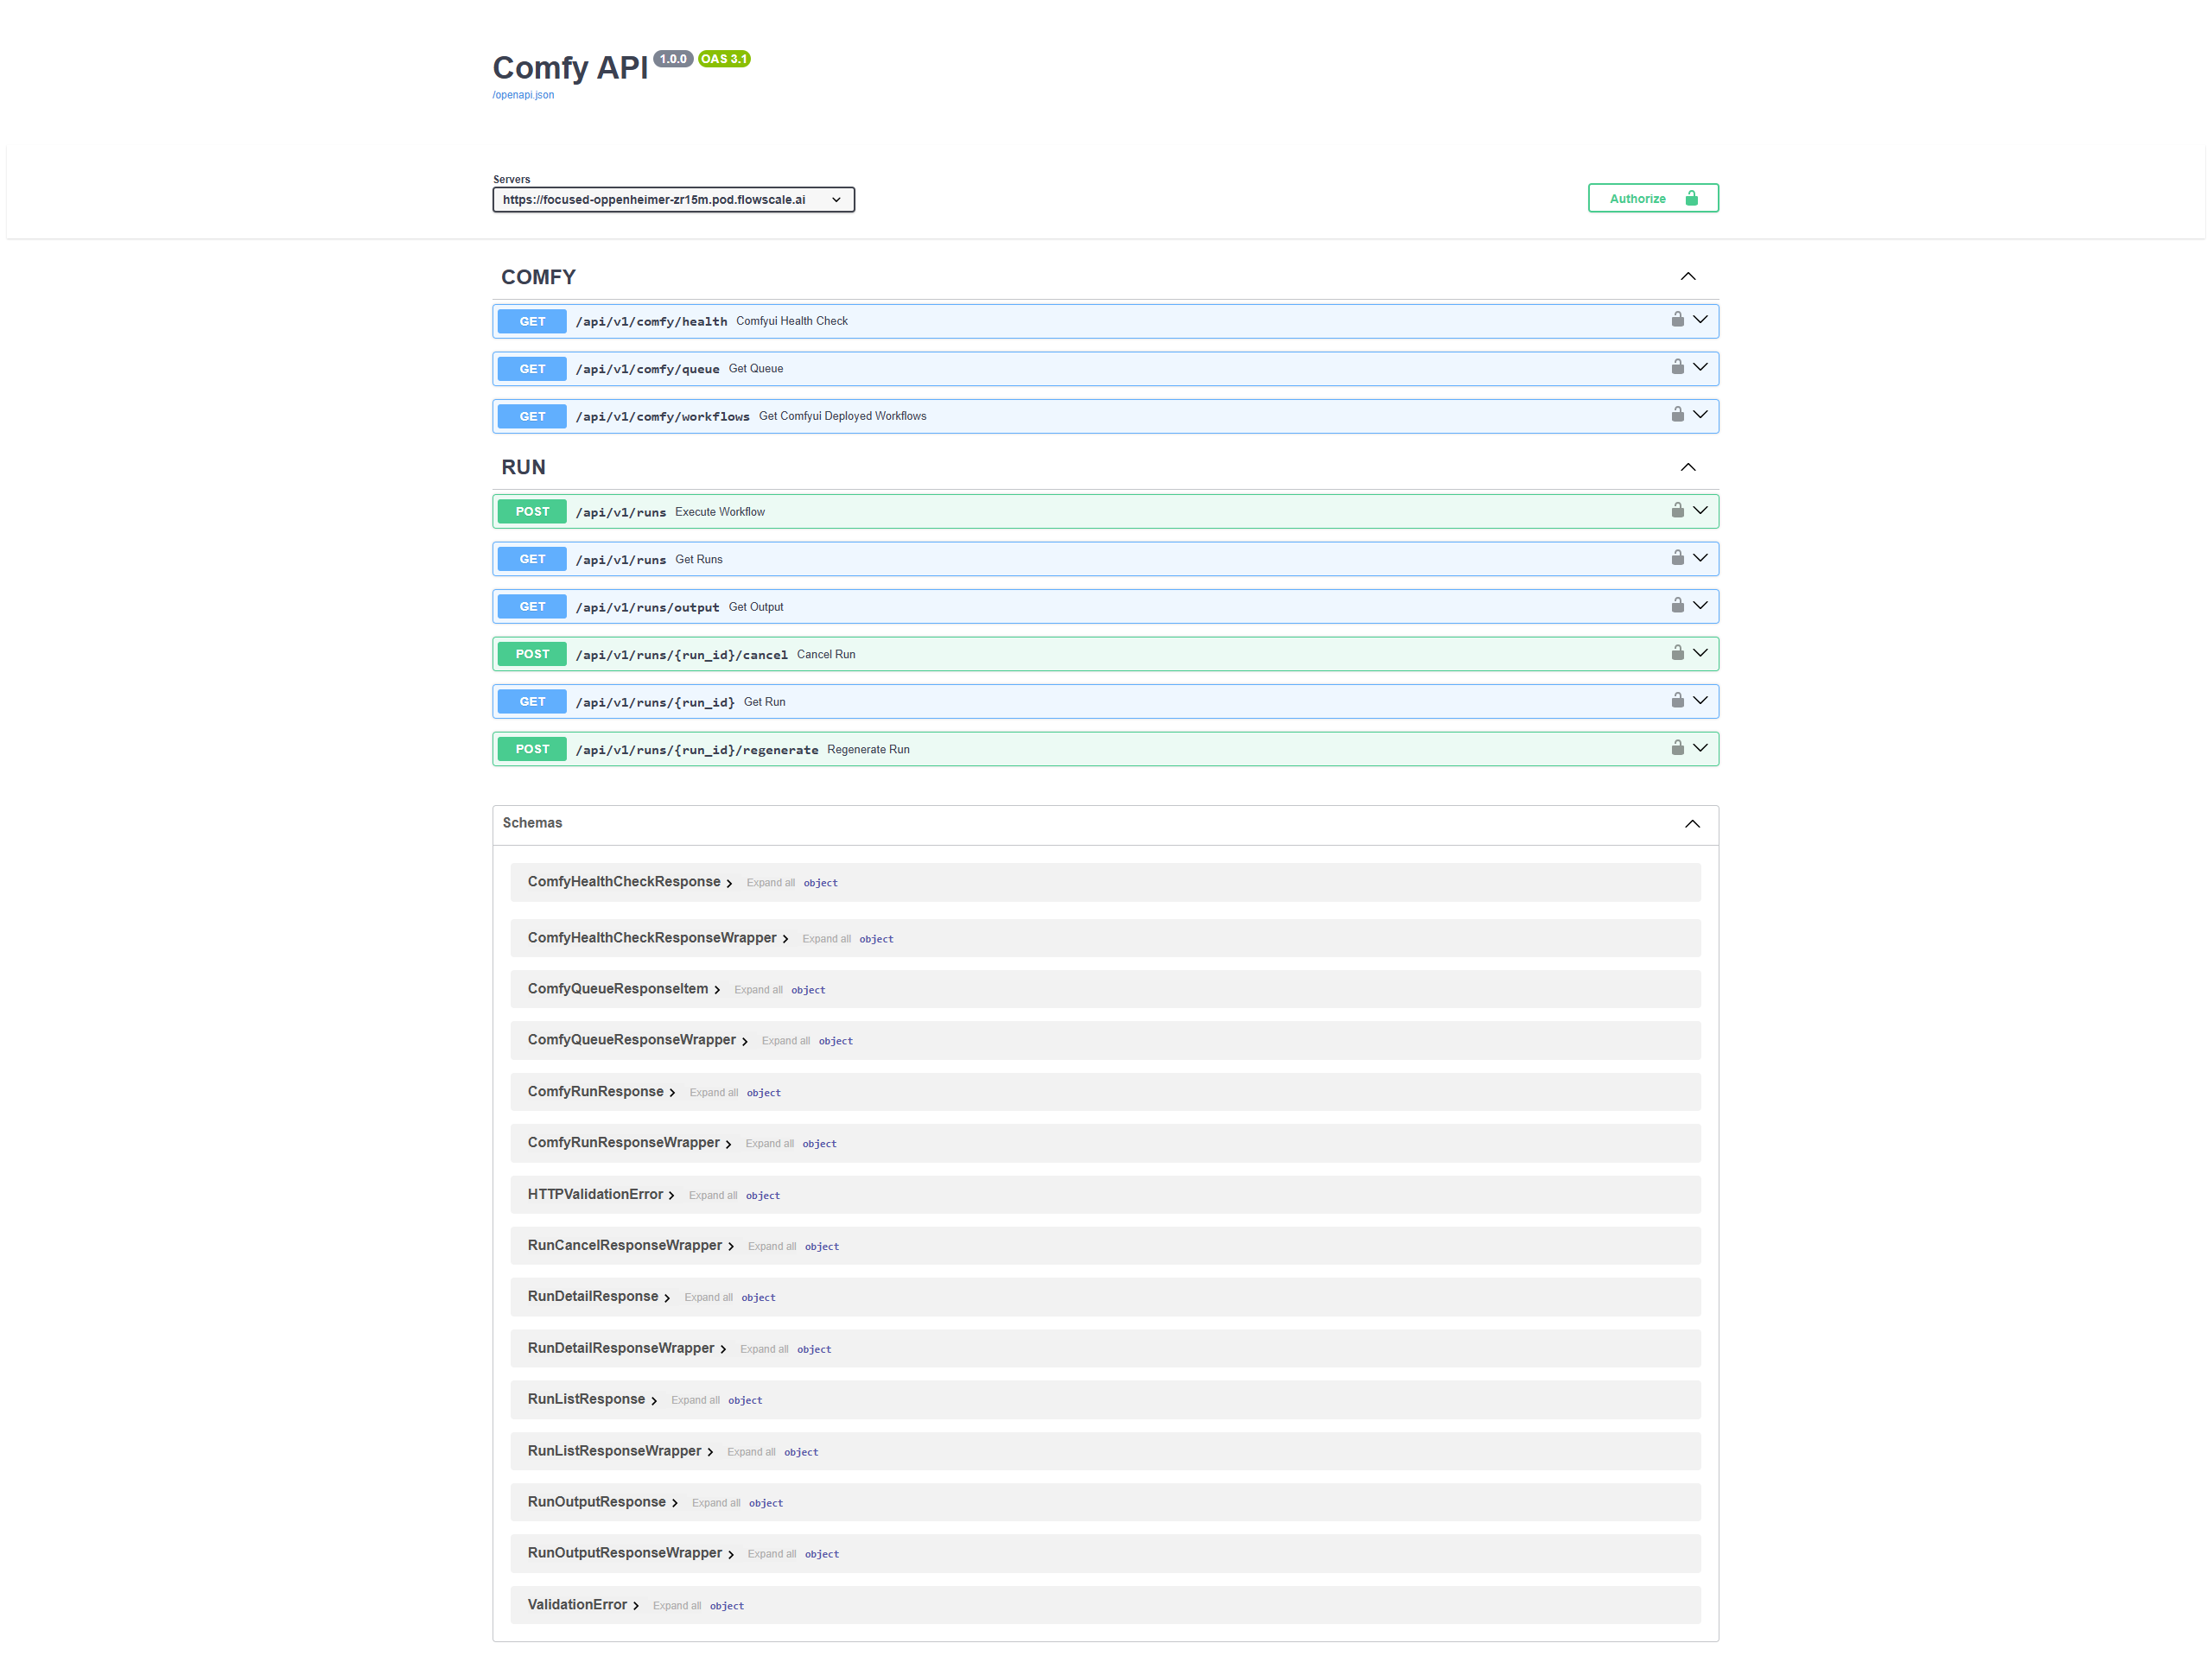
## API Documentation
FlowScale AI automatically generates comprehensive API documentation:
* **Interactive docs**: Test endpoints directly in the browser
* **Code examples**: Ready-to-use snippets in multiple languages
* **Schema definitions**: Detailed input/output specifications
* **Authentication**: API key management and security
Benefits of the playground interface:
* Accessible to non-technical team members
* Faster feedback cycles on actual results
* Interactive client demonstrations
* Mobile-friendly access
* User confidence through direct testing
## API Documentation
FlowScale AI automatically generates comprehensive API documentation:
* **Interactive docs**: Test endpoints directly in the browser
* **Code examples**: Ready-to-use snippets in multiple languages
* **Schema definitions**: Detailed input/output specifications
* **Authentication**: API key management and security
 ## Production Considerations
### Security & Authentication
* **API keys**: Secure access with regeneratable keys
* **Rate limiting**: Protect against abuse and manage costs
* **CORS configuration**: Control cross-origin access
* **Webhook support**: Real-time notifications for long-running jobs
### Performance Optimization
* Model caching to reduce cold start times - Result caching for identical
requests - CDN integration for faster content delivery
* Async processing for long-running workflows - Batch requests to reduce
overhead - Progressive loading for large outputs
* Auto-scaling based on demand - GPU pooling for efficient utilization -
Memory optimization for large models
## Next Steps
Your workflow is now deployed as production infrastructure. Continue building:
Learn API integration for web apps, mobile apps, and automation systems
Explore advanced configuration, scaling controls, and governance options
Monitor usage, optimize costs, and ensure peak performance
## Production Considerations
### Security & Authentication
* **API keys**: Secure access with regeneratable keys
* **Rate limiting**: Protect against abuse and manage costs
* **CORS configuration**: Control cross-origin access
* **Webhook support**: Real-time notifications for long-running jobs
### Performance Optimization
* Model caching to reduce cold start times - Result caching for identical
requests - CDN integration for faster content delivery
* Async processing for long-running workflows - Batch requests to reduce
overhead - Progressive loading for large outputs
* Auto-scaling based on demand - GPU pooling for efficient utilization -
Memory optimization for large models
## Next Steps
Your workflow is now deployed as production infrastructure. Continue building:
Learn API integration for web apps, mobile apps, and automation systems
Explore advanced configuration, scaling controls, and governance options
Monitor usage, optimize costs, and ensure peak performance