> ## Documentation Index
> Fetch the complete documentation index at: https://docs.flowscale.ai/llms.txt
> Use this file to discover all available pages before exploring further.
# Pods
> Cloud GPU infrastructure that powers your ComfyUI workflows and deployments
**TL;DR:** A Pod is a cloud GPU machine managed by FlowScale AI that powers your ComfyUI workspace and any APIs/playgrounds you deploy from a project. Pods give you fine‑grained control over cost, performance, access, and scale—all without having to provision infrastructure yourself.
## Why Pods Exist
Every FlowScale AI project needs an attached pod to spin‑up a ComfyUI workspace in the cloud
Deploy workflows as API endpoints with a Playground UI
Serverless GPU containers that scale automatically based on traffic
## Key Concepts
The graphics card model used by the pod (e.g. *T4 16GB*, *A10G 24GB*, *L40S 48GB*, *A100 40GB*, *A100 80GB*, *H200 141GB*, *B200 180GB*). Each model has a different \$/hr rate.
The *maximum* number of GPU workers the pod can burst to during high load.
Time a container waits after a generation before parking (→ \$0.07/hr CPU fee only).
The first request that wakes an idle container. Adds \~10‑20s latency depending on model size.
Containers you pin **always‑on**. Great for latency‑sensitive use cases; incurs full GPU cost 24/7.
Hard cap (in minutes) on a single generation. Prevents runaway jobs & surprise bills.
Optional soft‑limit that stops the pod once the specified credit amount is consumed.
## Pod Types & GPU Configurations
**Best for:** Development, simple workflows, testing
Perfect for getting started and lightweight image generation tasks
**Best for:** Enhanced development, moderate workloads
Cost-effective option with improved performance over T4
**Best for:** Standard image generation, medium workloads
Balanced performance for most production use cases
**Best for:** Advanced image/video generation, large models
High-memory GPU for complex multi-modal workflows
**Best for:** Complex workflows, large model training
High-performance computing for demanding AI tasks
**Best for:** Massive models, extensive batch processing
Maximum A100 memory for the largest workloads
**Best for:** Largest models, real-time inference
Top-tier performance for the most demanding workloads
**Best for:** Massive models, extreme workloads
Maximum memory capacity for the largest AI models
**Best for:** Next-generation AI inference, cutting-edge models
Latest architecture with massive memory for breakthrough AI performance
## Creating a Pod
Go to **Pods → ➕ New Pod**
Pick a **GPU Type** that balances memory requirements vs. price
Set **Allotted GPU Containers** (start with 1 unless you expect heavy traffic)
Tick **Assign Credit Budget** and enter a limit to control costs
Click **Create Pod** — ComfyUI is now one click away!
## Pod Settings Configuration
Navigate to **Pods › *Your Pod* › Settings** to access three configuration tabs:
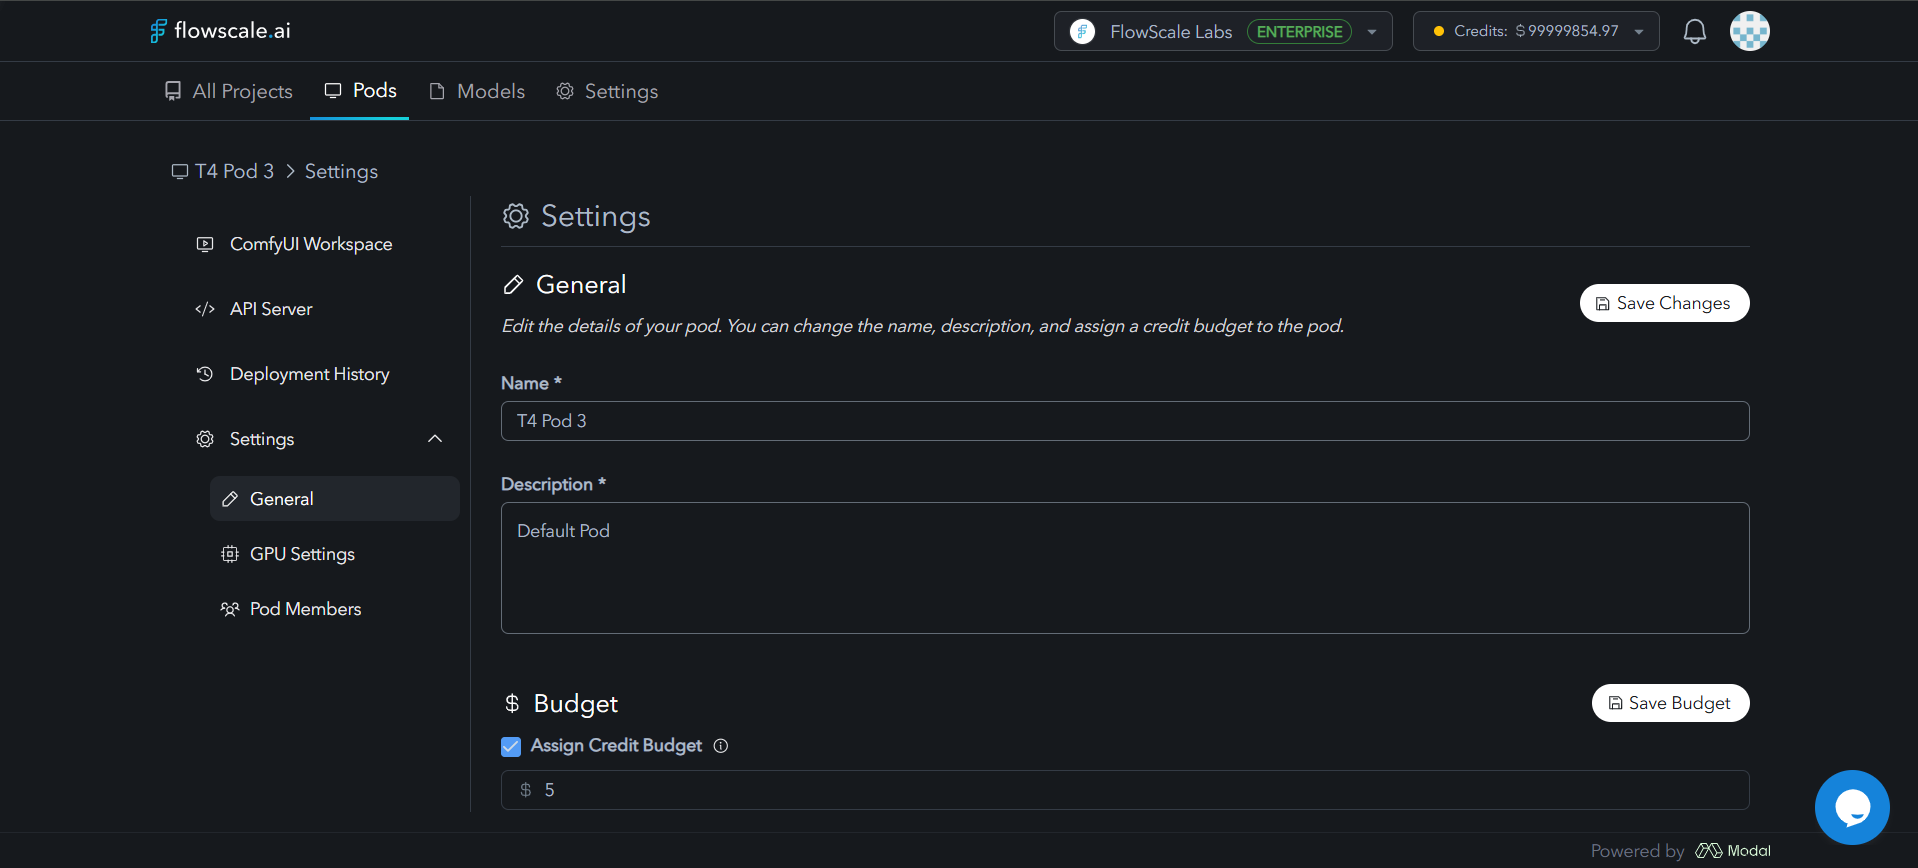 * Rename or add description to your pod
* Toggle **Assign Credit Budget** and manage spending limits
* Rename or add description to your pod
* Toggle **Assign Credit Budget** and manage spending limits
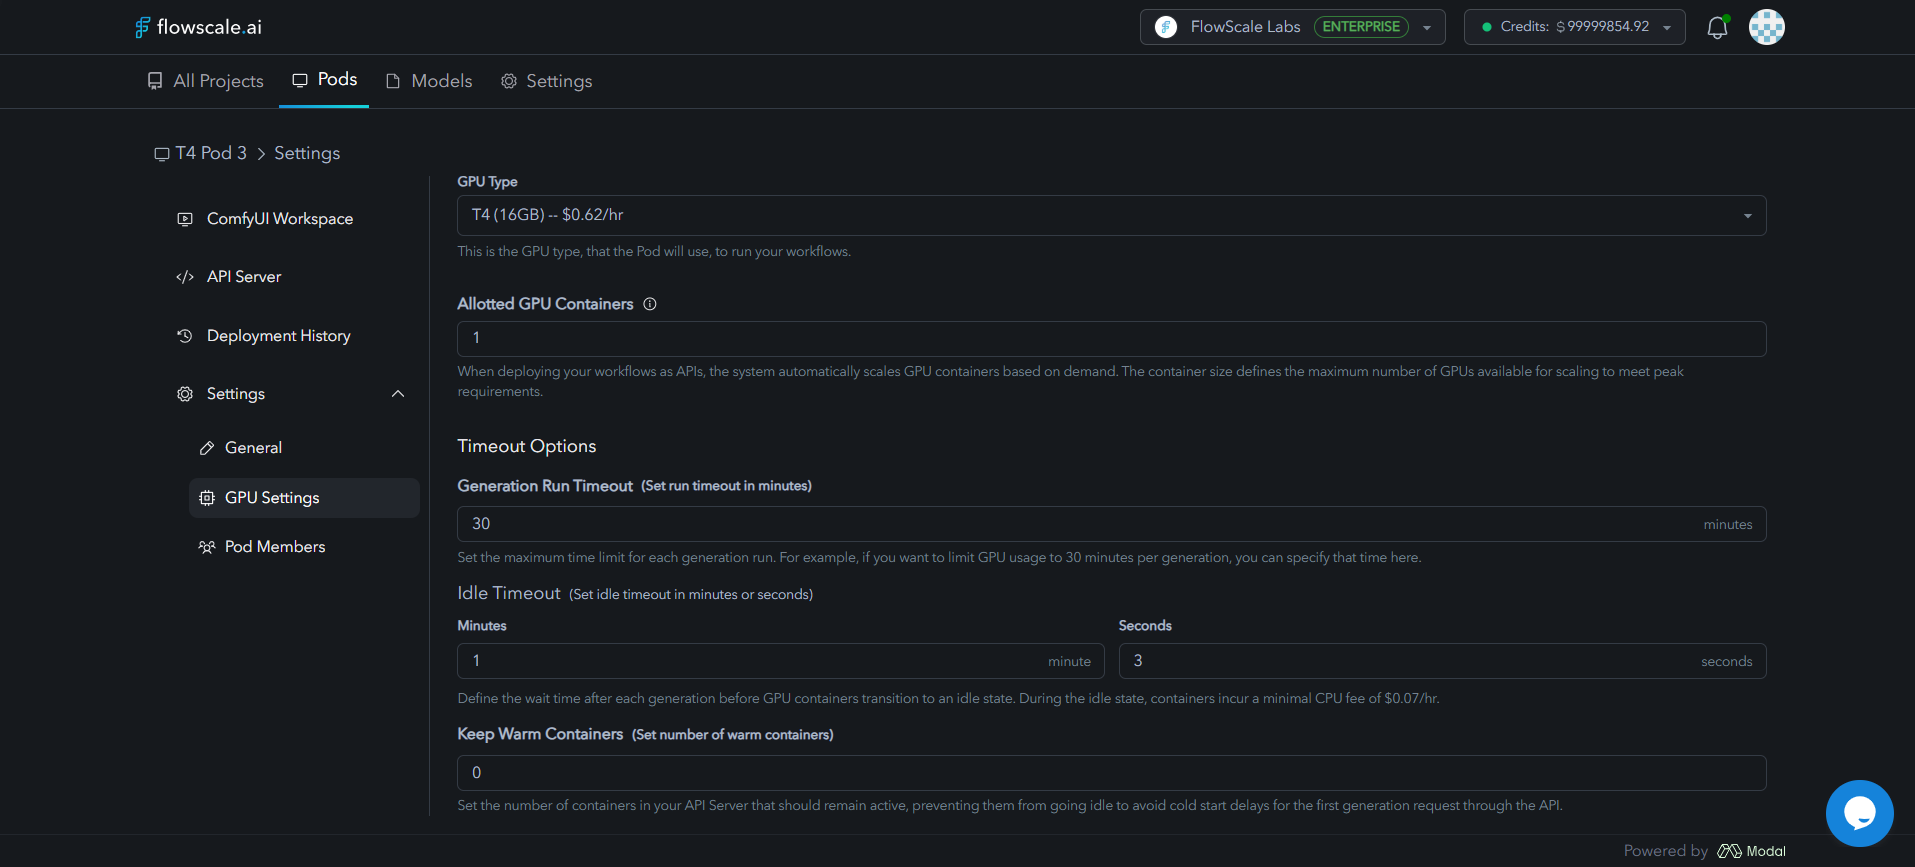 **Core Configuration:**
* Change the **GPU Type**
* Adjust **Allotted GPU Containers**
**Timeout Options:**
* **Generation Run Timeout** – cap per‑request time
* **Idle Timeout** – how long containers stay warm after each request
**Performance Optimization:**
* **Warm Containers** (visible when scaling > 1) – pin a subset always‑on
Start with Idle Timeout = 60s and Warm Containers = 0 to minimize spend, then optimize for latency later.
**Access Control:**
* Add teammates by handle or email
* Assign **Owner**, **Admin**, or **Member** roles
* Only listed members and service accounts can access ComfyUI workspace or call private APIs
## How Pod Scaling Works
**Key Phases:**
* **Cold Start** – Container boots and loads workflow graph ± model weights
* **Warm Pool** – Containers stay resident until *Idle Timeout* expires
* **Round‑Robin** – FlowScale AI evenly distributes jobs to maximize utilization
## Cost Control Best Practices
Use the smallest GPU that meets VRAM requirements
Keep **Allotted GPU Containers** realistic (1‑2 for dev, ≥3 for prod)
Set **Run Timeout** ≤ expected worst‑case generation + 20%
Tune **Idle Timeout** (30‑120s sweet spot) before going live
Apply a **Credit Budget** on every non‑trial pod
## Monitoring & Performance
Monitor CPU, GPU, memory, and storage utilization in real-time
Track execution times, throughput, and latency patterns
Monitor error rates, failure types, and get debugging information
Track resource costs and identify optimization opportunities
## Next Steps
Deploy your ComfyUI workflows to production pods
**Core Configuration:**
* Change the **GPU Type**
* Adjust **Allotted GPU Containers**
**Timeout Options:**
* **Generation Run Timeout** – cap per‑request time
* **Idle Timeout** – how long containers stay warm after each request
**Performance Optimization:**
* **Warm Containers** (visible when scaling > 1) – pin a subset always‑on
Start with Idle Timeout = 60s and Warm Containers = 0 to minimize spend, then optimize for latency later.
**Access Control:**
* Add teammates by handle or email
* Assign **Owner**, **Admin**, or **Member** roles
* Only listed members and service accounts can access ComfyUI workspace or call private APIs
## How Pod Scaling Works
**Key Phases:**
* **Cold Start** – Container boots and loads workflow graph ± model weights
* **Warm Pool** – Containers stay resident until *Idle Timeout* expires
* **Round‑Robin** – FlowScale AI evenly distributes jobs to maximize utilization
## Cost Control Best Practices
Use the smallest GPU that meets VRAM requirements
Keep **Allotted GPU Containers** realistic (1‑2 for dev, ≥3 for prod)
Set **Run Timeout** ≤ expected worst‑case generation + 20%
Tune **Idle Timeout** (30‑120s sweet spot) before going live
Apply a **Credit Budget** on every non‑trial pod
## Monitoring & Performance
Monitor CPU, GPU, memory, and storage utilization in real-time
Track execution times, throughput, and latency patterns
Monitor error rates, failure types, and get debugging information
Track resource costs and identify optimization opportunities
## Next Steps
Deploy your ComfyUI workflows to production pods