Get Started
Manage Workflows
Collaborate with your team to build, manage, and version your workflows.
In FlowScale, managing workflows effectively is crucial for collaborating with team members, tracking changes, and maintaining different versions. This guide covers how to collaborate on workflows, manage workflow versions, handle GitHub integration, and manage AI models and custom nodes.
Table of Contents
1. Collaboration on Workflows
FlowScale allows multiple team members to work on the same workflows. While real-time editing isn’t available yet, FlowScale provides efficient ways to collaborate and manage changes.Adding Collaborators to a Project
To collaborate on a workflow, you need to add team members to your project as collaborators:-
Add Project Collaborators:
In order to add collaborators, you must be the project owner. Follow this documentation to add a project collaborator. -
Collaborating on Workflows:
After adding collaborators, multiple team members can work on the same ComfyUI instance. However, real-time updates and shared editing are not yet available. Team members should avoid editing the same workflow simultaneously to prevent conflicts. Important: When a team member saves changes to a workflow, others must refresh the workflow list on the left side of the editor to see the updates. This ensures that everyone is working on the most current version.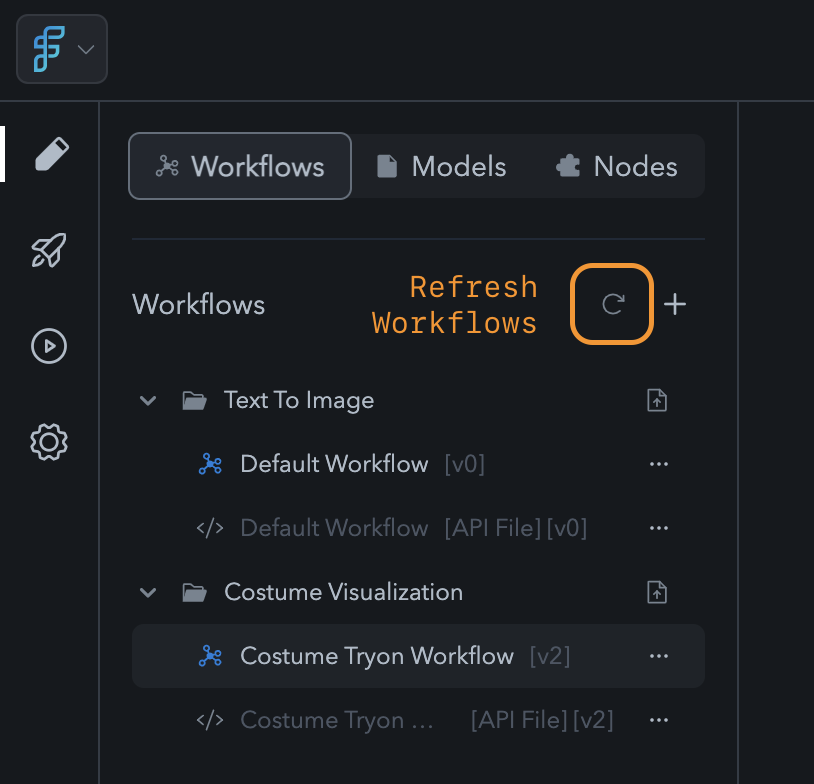
Refresh Workflows
Permissions for Collaborators
- Owner: The project owner has full control and can add/remove collaborators. They are also responsible for managing project settings.
- Collaborators: Can make all changes to workflows (e.g., edit workflows, add/remove nodes, manage models) but cannot add or remove other collaborators.
2. Workflow Versioning
Tracking changes in workflows is crucial for ensuring that different versions are properly managed. In FlowScale, every workflow save is versioned via GitHub commits.Saving Workflow Versions
-
Make Changes:
Open a workflow and make the necessary changes. When you’re done, click Save Changes on the action bar.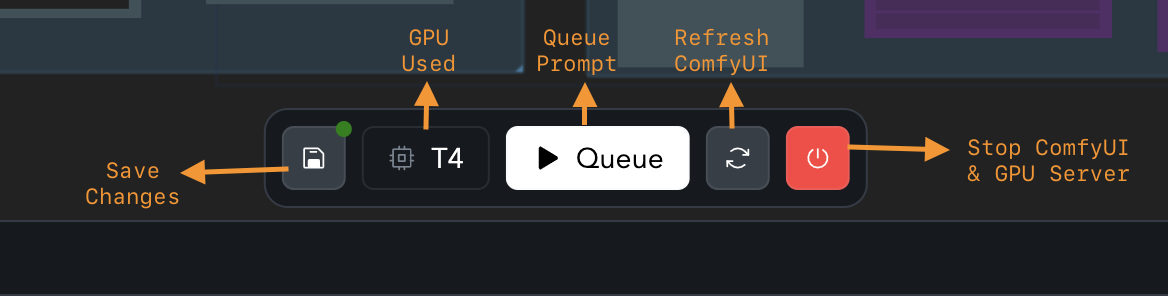
Action Bar
-
Provide a Commit Message:
A dialog box will appear prompting you to enter a commit message. This message describes the changes made to the workflow.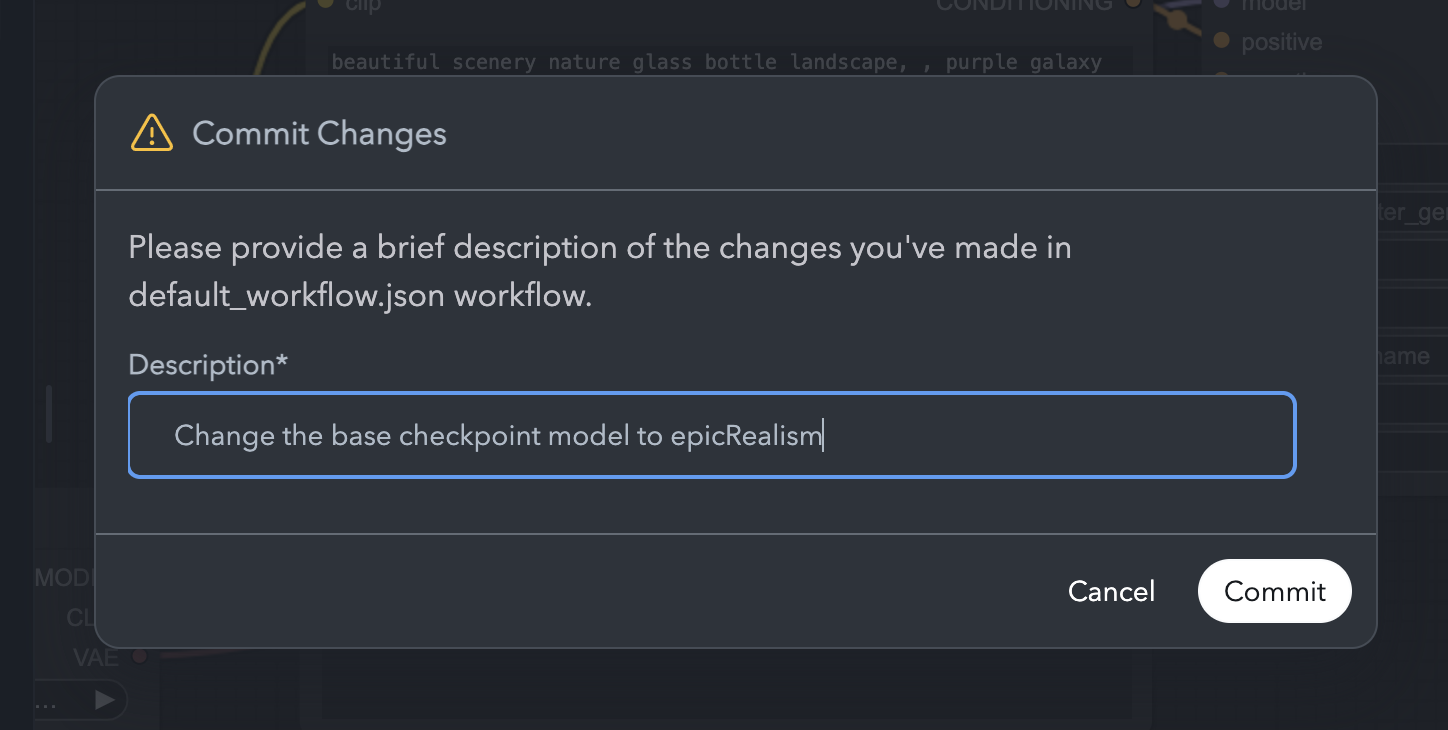
Commit Message
-
Version Creation:
Each time you save, the workflow is saved as a new version. These versions are tied to GitHub commits, allowing you to track changes over time.
Viewing and Managing Workflow Versions
-
Change History:
To view the version history of a workflow:- Open the Workflows tab in the left sidebar.
- Hover over the workflow and click the triple dot menu.
- Select Change History to see all saved versions and changes.

Change History Option
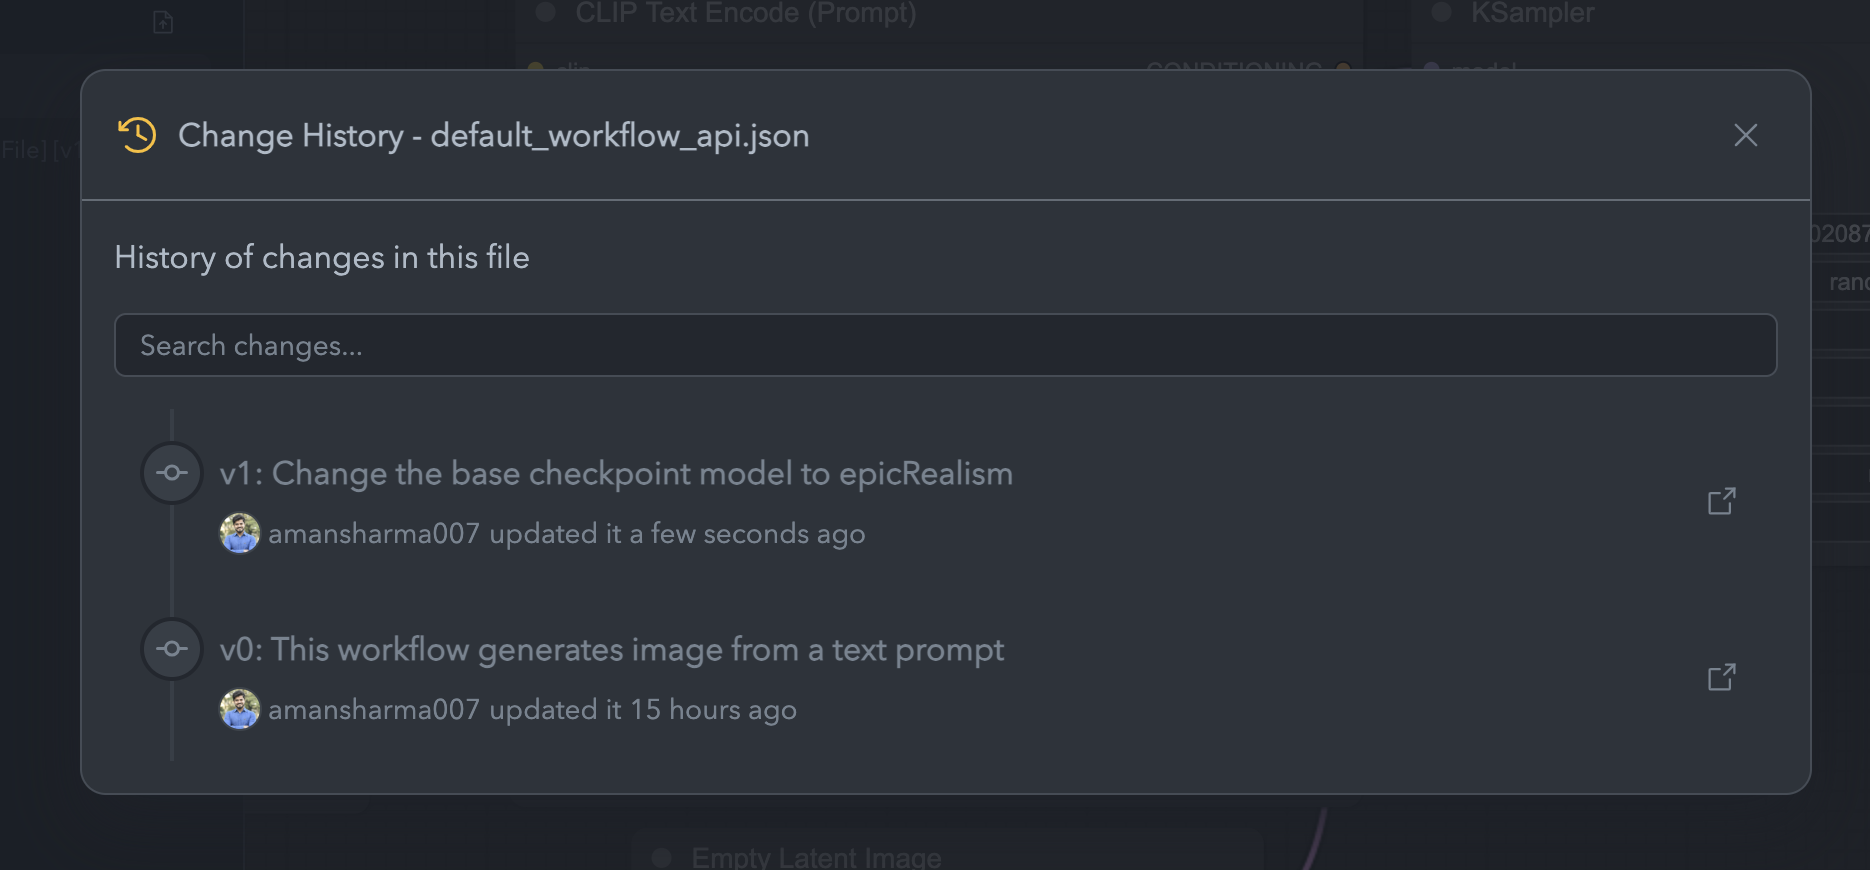
Change History
-
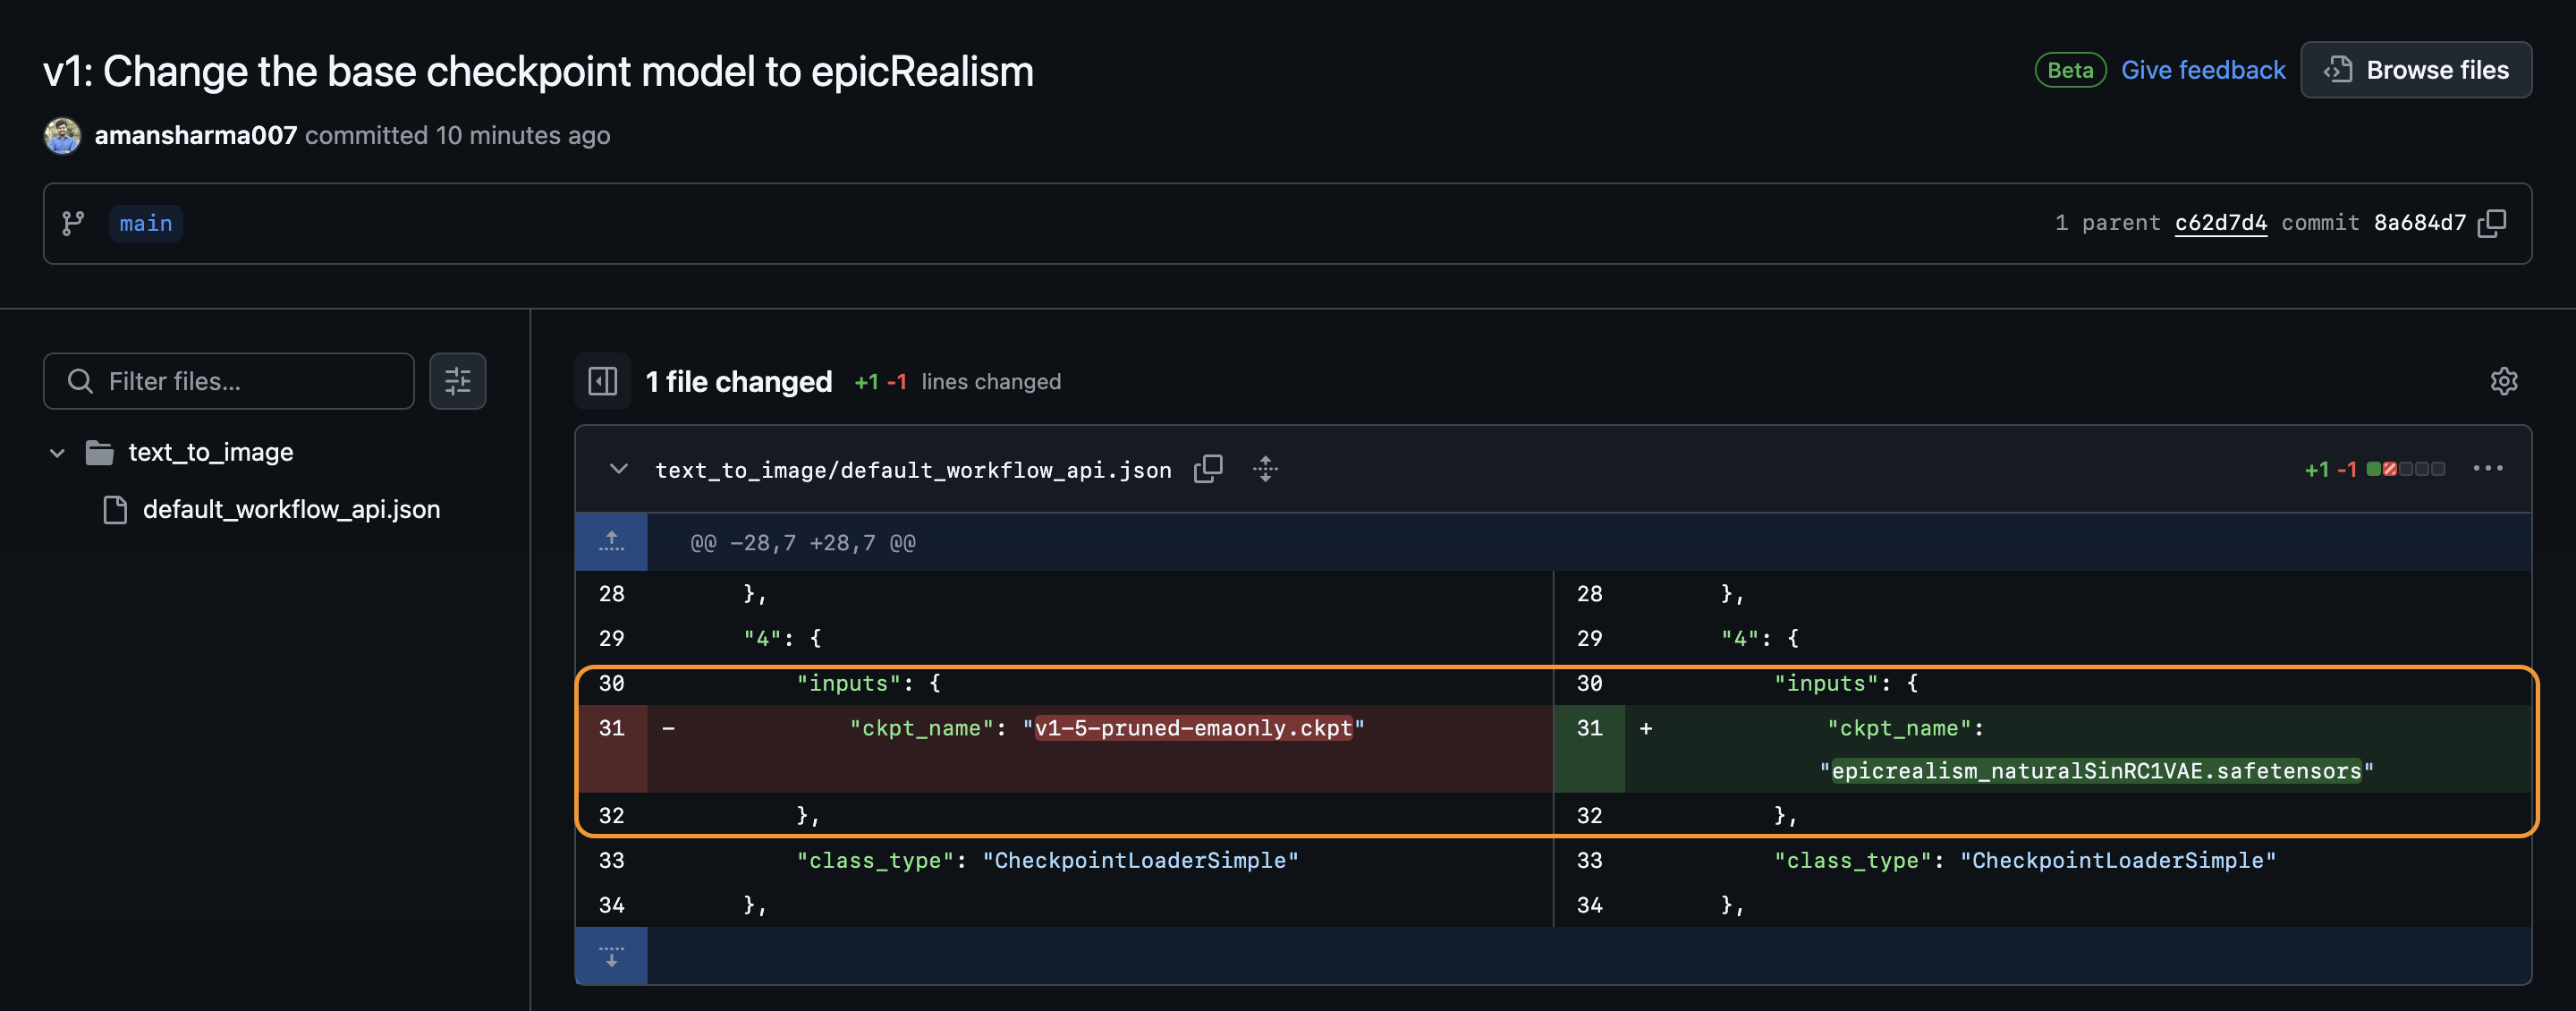
Viewing Commit Details:
To see detailed changes, click the version you want to inspect. This will open the commit on GitHub, where you can view the workflow’s JSON file changes. Tip: Focus on the API JSON file in GitHub, as it tracks meaningful workflow changes without recording positional adjustments like node placement.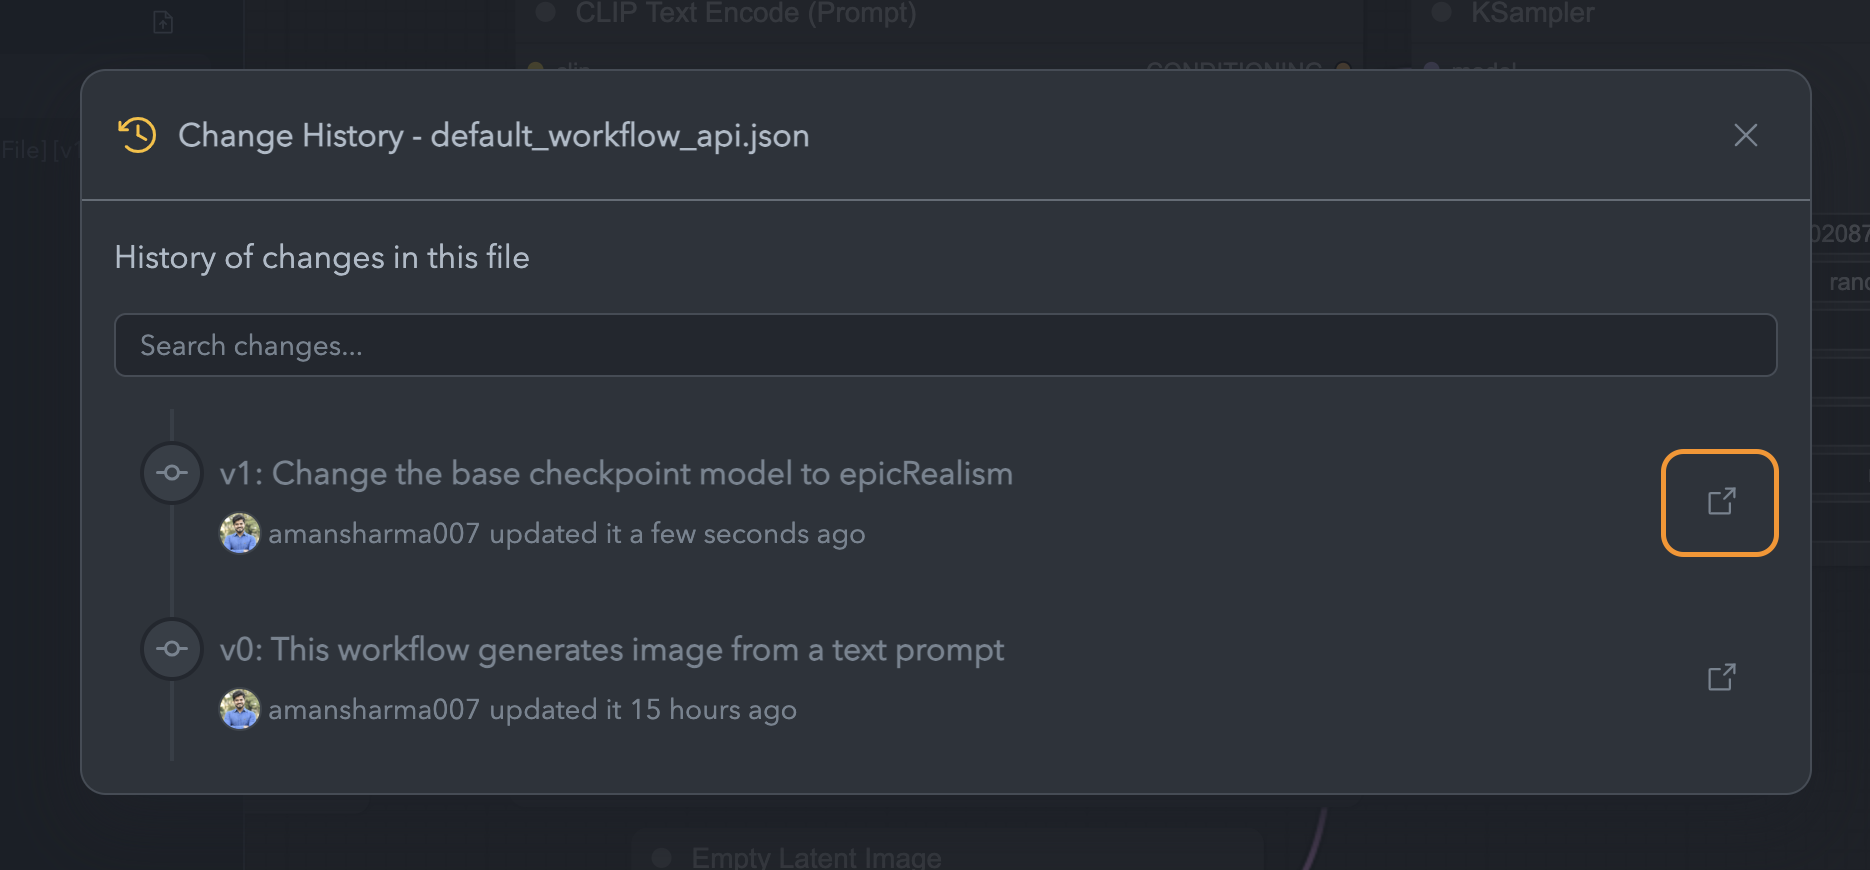
View Commit
Commit Details
Restoring Previous Versions
At this time, FlowScale does not support the ability to restore previous versions directly in the UI. However, you can view older commits and manually recreate a workflow based on the version history.3. GitHub Integration
FlowScale deeply integrates with GitHub to securely manage and version workflows. Each project in FlowScale corresponds to a GitHub repository, ensuring that users maintain full control of their workflow data.How GitHub Integration Works
-
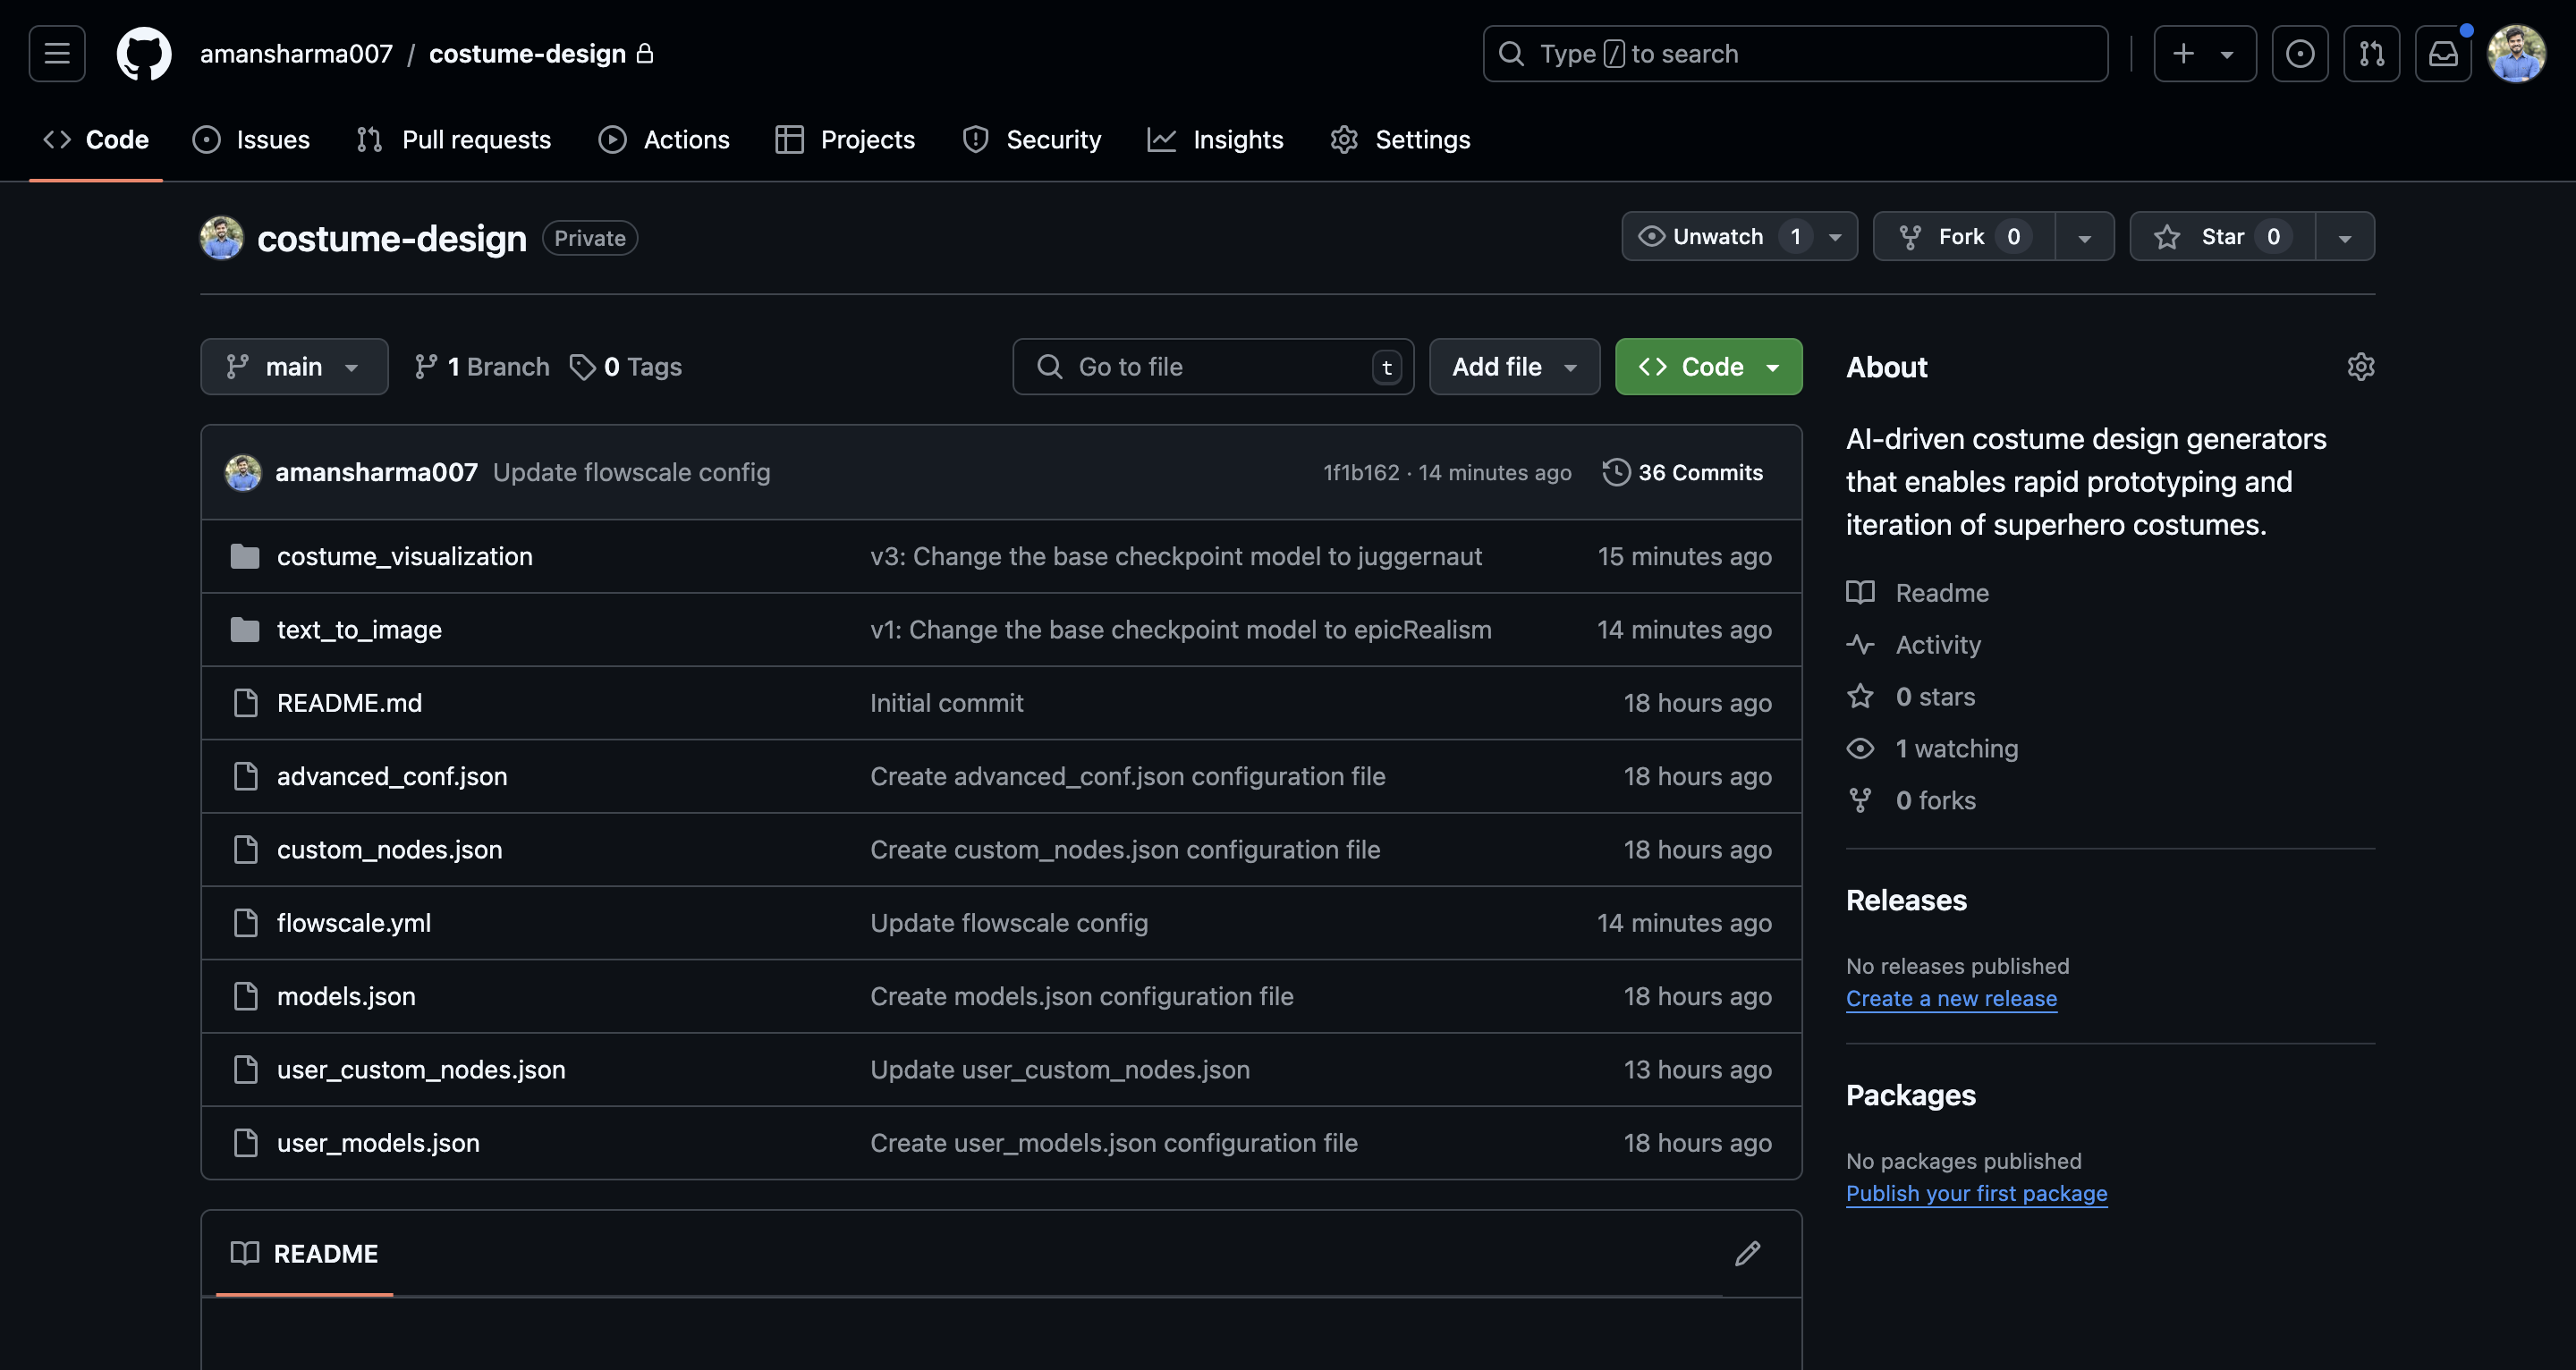
Project Repositories:
When you create a project in FlowScale, a corresponding GitHub repository is created under your account. This repository holds all your workflow data and ensures that you have complete control over your intellectual property.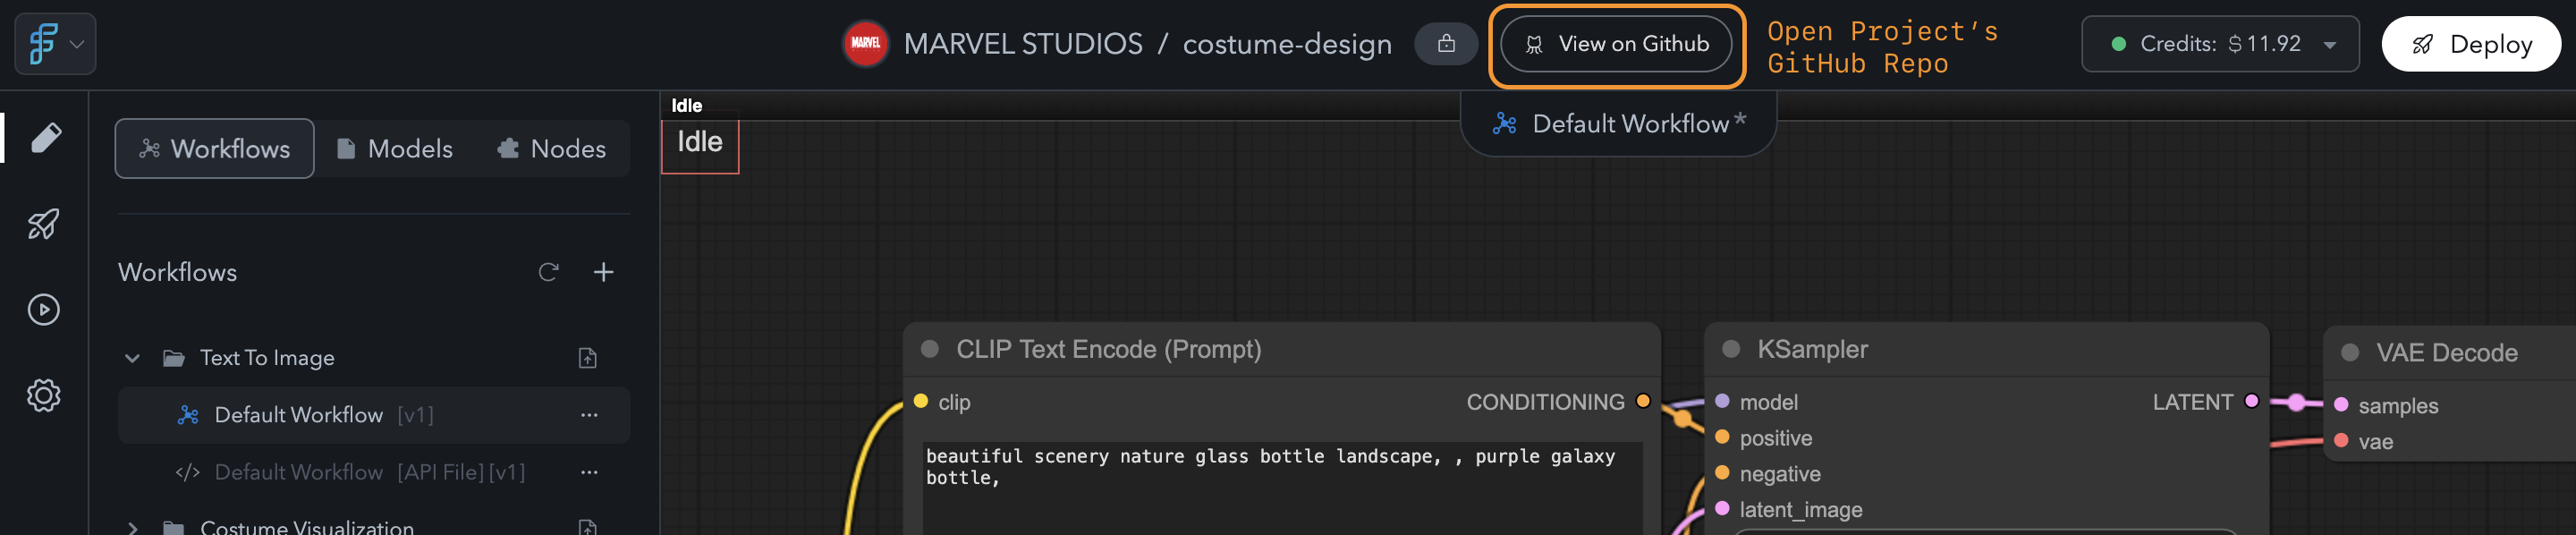
View GitHub Repo
Commit Details
-
Committing Changes:
Every time you save a workflow, FlowScale automatically pushes the changes as a GitHub commit. This keeps the repository updated without any manual effort.
How GitHub Commits Are Tied to Workflow Changes
Each commit represents a version of the workflow. When you save a workflow, the changes are automatically committed to GitHub, ensuring traceability. Users can view commit details in the Change History section or directly on GitHub.4. Model and Node Management
Managing AI models and nodes is essential for ensuring that your workflows run smoothly, regardless of the version. In FlowScale, models and nodes are managed separately from workflow versions.Managing AI Models and Nodes Across Workflows
- AI Models and Custom Nodes are managed independently of workflows. This means that changes to models or nodes do not directly affect individual workflow versions.
- The Models and Nodes tabs on the left sidebar allow users to manage models and nodes for all workflows within the project.
Shared Library of Models
-
Models:
FlowScale provides a shared library for public models (available to all users) and private models (uploaded by the user). These models are accessible across all projects, not limited to a specific one. You can check out this document to learn more about managing models.
Updating Nodes Without Affecting Workflows
- Users must manually ensure that any custom nodes required for workflows are not deleted or changed without consideration. Deleting a node may cause existing workflows to fail.
- If you delete a node and suspect it may affect a workflow, re-import the workflow to trigger an analysis of required nodes. This process will detect and reinstall any missing nodes. You can check out this document to learn more about building workflows and adding custom nodes. Tip: Keep the number of installed nodes below 35-40 to ensure the best performance. Having too many nodes (especially complex nodes like Mixlab, etc) can slow down your machine’s cold start time.